The Dynaco Tube Audio Forum

Would you like to react to this message? Create an account in a few clicks or log in to continue.
The Dynaco Tube Audio Forum

Dedicated to the restoration and preservation of all original Dynaco tube audio equipment - Customer support for Tubes4hifi VTA tube amp and preamp kits and all Dynakitparts.com products


5 posters

    PAS3 rebuild

    Roy Mottram
    Roy Mottram
    Admin


    Posts : 1839
    Join date : 2008-11-30

    PAS3 rebuild Empty PAS3 rebuild

    Post by Roy Mottram Wed Mar 27, 2013 1:08 pm

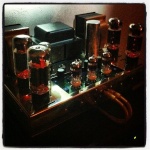
    I've been doing quite a bit of PAS3 rebuilds lately and thought I'd share a couple of before and after photos.
    This one already had my upgraded power supply before, but nothing else.
    Added the I-O board and selector switch, ALPs volume & balance pots, my PH6 phono circuit, and my TCLA (tone control line amp).
    These changes make an incredible change not just in the appearance but in the sound quality and performance.
    The power supply (and the LED pilot lamp) are an absolute must in any PAS preamp.
    The ALPs controls are a huge improvement. The "rat's nest" original selector mess is an obvious disaster.
    These are the same exact mods Sal did for Kevin about a year ago, very popular setup.
    Next week, I'll post photos of my "ultimate" upgrades, the regulated power supply, the PH10 phono, and the AIKIDO line stage.


    PAS3 rebuild Pas-before

    PAS3 rebuild Pas-after
    peterh
    peterh


    Posts : 1832
    Join date : 2012-12-25
    Location : gothenburg, sweden

    PAS3 rebuild Empty Re: PAS3 rebuild

    Post by peterh Wed Mar 27, 2013 3:10 pm

    I'm preparing to reinstall the original pc5 and pc6 after checking up and
    replacement of a few resistors.
    ( the current ones from vintage electronics has metalfilm resistors )

    But this time i will solder wirewrap pins in the eyelets and mount corresponding
    connectors on all cables, thus i may in the future switch boards without soldering.

    Using goldplated pins and connectors _should_ stay out of trouble.

    Which reminds me; why not build future amps ( hey bob !) with connectors
    to enable removal/replacement without soldering.


    Pillo69
    Pillo69


    Posts : 176
    Join date : 2012-04-11
    Location : Granada (España)

    PAS3 rebuild Empty Re: PAS3 rebuild

    Post by Pillo69 Thu Mar 28, 2013 8:24 pm

    Interestingly this thread, I have been following the modifications to include on my plate PAS PH6 phono and line with tone controls, but did not know if the transformer admitted that power tubes (6 units).
    Roy Mottram
    Roy Mottram
    Admin


    Posts : 1839
    Join date : 2008-11-30

    PAS3 rebuild Empty Re: PAS3 rebuild

    Post by Roy Mottram Fri Mar 29, 2013 3:20 pm

    if you are going to use a 6 tube combination it's best to replace or supplement the power transformer, as it was pretty marginal to begin with.
    It has too much b+ voltage (almost 400v), not enough B+ current (10-15ma), and the filament supply is 10.5vac at 1amp.
    After going thru a voltage doubler you've got around 22vdc and enough current to run 5 tubes if you replace the pilot lamp with an LED.
    Running 6 tubes drops the filament voltage down to around 10v per tube (instead of 12v) and the B+ will sag way down to around 330v.
    It will work but definitely not optimal. You can either add a small separate 12v 300ma transformer to run the rectifier tube,
    or go to a larger 12v 2 amp transormer to run everything, which is what I do with my regulated supply, which also adds a 230vac 50ma tranformer.
    With that combo you can run 6 tubes easy. I'll be posting more photos next week with what I consider the ultimate setup for a PAS3 preamp.


    Last edited by tubes4hifi on Wed Apr 03, 2013 9:05 pm; edited 2 times in total
    Roy Mottram
    Roy Mottram
    Admin


    Posts : 1839
    Join date : 2008-11-30

    PAS3 rebuild Empty Re: PAS3 rebuild

    Post by Roy Mottram Fri Mar 29, 2013 11:45 pm

    OK, sneak preview of the start of the "ultimate" PAS rebuild. I'll be finishing this up next week.
    Started here with absolutely nothing at all except the 3 flat pieces that make up the basic shell of the PAS chassis.
    This photo here shows the REG-PS ($119 kit), the PAS-AIKIDO ($79 kit), and the PH10 phono (($99 kit) installed in the chassis,
    the I-O (input-output PCB $59 kit) and the LED pilot lamp ( $8 ).
    Still to be installed are the selector, ALPs volume and balance,and POWER switch, plus all the tubes (total of all these parts $534).
    2 hours of total labor so far (stuffing the PCBs and installation in chassis).
    We'll keep track of all this because someone is gonna want to know what all this all costs.
    Next week, about 3 hours to wire it all together, for a total of about 5 hours ($180 at my discount rate).
    Since we started with less than a complete PAS chassis, we also need a front panel, knobs, and a cover (from Kevin @ DynaKitParts)
    which will add $150). So it will be right around $860 total including labor. About $700 if you start with a complete PAS3.
    That includes all parts and all labor. Compare to a similar SP12 preamp with the PH10 added, which is $900 kit or $1260 all assembled & tested,
    so this actually is a decent deal. And don't forget, all these parts fit into a PAT4 chassis which costs around $200 less than a PAS3.

    PAS3 rebuild PAS-04


    Last edited by tubes4hifi on Wed Apr 03, 2013 9:07 pm; edited 1 time in total
    Roy Mottram
    Roy Mottram
    Admin


    Posts : 1839
    Join date : 2008-11-30

    PAS3 rebuild Empty Re: PAS3 rebuild

    Post by Roy Mottram Tue Apr 02, 2013 9:19 pm

    OK, now all the wiring is done, 2 hours added to the photo above.
    All that's left to do is power up, test, and add the new front panel and knobs.
    Nice and clean (and that's what it sounds like too! Very Happy

    PAS3 rebuild Up45s
    Roy Mottram
    Roy Mottram
    Admin


    Posts : 1839
    Join date : 2008-11-30

    PAS3 rebuild Empty Re: PAS3 rebuild

    Post by Roy Mottram Wed Apr 03, 2013 9:02 pm

    well, it seems kind of anti-climatic finishing this. Power up and test was smooth and no problems.
    Everything worked perfect, all voltages were correct, everything sounded fine.
    So put on the new front panel and knobs, see photo below. The tone controls are dummies, since this preamp
    has the PAS-AIKIDO board in it, but this front panel was made for my TCLA mod and was readily available.

    PAS3 rebuild Up07s
    Roy Mottram
    Roy Mottram
    Admin


    Posts : 1839
    Join date : 2008-11-30

    PAS3 rebuild Empty Re: PAS3 rebuild

    Post by Roy Mottram Sat Apr 06, 2013 10:01 pm

    OK, now on to my next project, taking a Dynaco PAT-4 solid state preamp which I bought on ebay for $60
    and making it into the ULTIMATE PAT-4 tube preamp ! See new thread:
    PAT-4 >> to ULTIMATE tube preamp
    Bigron865
    Bigron865


    Posts : 45
    Join date : 2013-03-15
    Age : 55
    Location : Birmingham Alabama

    PAS3 rebuild Empty Re: PAS3 rebuild

    Post by Bigron865 Sun Apr 07, 2013 9:29 am

    Nice!
    avatar
    gdlen1


    Posts : 17
    Join date : 2012-03-18

    PAS3 rebuild Empty Re: PAS3 rebuild

    Post by gdlen1 Thu Apr 18, 2013 6:37 am

    Awesome work! almost finished a full Z-mod upgrade on my PAS-2, just need to install the new selector switch and signal wiring, and I'm already tempted by the Aikido PAS linestage upgrade, damn, I thought I'd nearly finished.

    Sponsored content


    PAS3 rebuild Empty Re: PAS3 rebuild

    Post by Sponsored content


      Current date/time is Fri Apr 19, 2024 10:21 am