Probably best to first tie those ears back or wear a hat ...

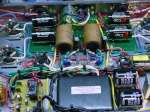
I just finished building one of Bob's kits and couldn't be happier with the results.
Tools I used for the build ...
- Soldering station. I got a Weller WES51 analog that's never let me down. Almost instant heat and recovery, nice light iron, self grounding, and easy to adjust.
- Solder. Kester 60/40 flux core is good. Stay away from the "green" varieties as they're harder to work with.
- Flux paste. Good for keeping your tip clean and improving heat transfer.
- Solder wick or desoldering tool or both. For the minor mistakes. The RatShack desoldering tool is cheap and da bomb.
- Needlenose and flat nose pliers are handy for the tight spots.
- Xcelite 170M sheer cutters. Best snip you can get for the money. Great for close trims on sockets and zip ties.
- Small screwdrivers for mounting hardware. You can get a "jewelers" set at most any hardware that will give you a good variety.
- A ceramic screwdriver is nice for adjusting the trim pots.
- A small hand drill is great for twisting wires. Just chuck them up, put the other ends in a vise or tape them to the bench, and give er a spin. Not too much ... 3-4 turns per inch is plenty, and you don't want to stretch the wire.
- Nutdrivers are handy, but you should be able to get away with the flat nose pliers if you don't want to spring for those.
GOOD LIGHT! Even and no shadows, and a bench light is a big plus. Bonus points if you get one with a magnifying lens. More important for us old timers, but you really need to be able to get up close and personal with your work!
Other than that, a good spot to work and stay organized, patience, and attention to detail ...
Oh. And PRACTICE. If you're new with an iron, good idea to play with it first to get a feel for what a good joint should look like. I always clean and pre-tin the parts before making the actual connection. Don't be afraid to use enough solder either - most common problems are joints that are too dry. You don't want too much, but you want a good shiny blob with good flow all around the connection - no spikes or sharp edges allowed! You should have to look real close to see where the solder ends on the metal. You'll want to dress the tube sockets especially well as those go thru a lot of hot/cold cycles over time which can cause a weak joint to crack or shrink.
Most of all ... this is supposed to be fun. If something's not going right, back off and come back another day. A time out will solve most problems. I mentioned attention to detail already, but good to know Bob's kits have taken care of a lot of that for you. Parts are all bagged and tagged, and all you really have to do is follow the line by line instructions and check them off as you go along. Once it's done ... go over that checklist again to verify everything's where it's supposed to be, taking a good close look at each connection to make sure it's right and tight. If you work yourself into a corner, ain't no dumb questions ... post em up ...
And I can't stress this enough ... ALWAYS WEAR PANTS WHEN SOLDERING!!