The Dynaco Tube Audio Forum

Would you like to react to this message? Create an account in a few clicks or log in to continue.
The Dynaco Tube Audio Forum

Dedicated to the restoration and preservation of all original Dynaco tube audio equipment - Customer support for Tubes4hifi VTA tube amp and preamp kits and all Dynakitparts.com products


+14
jjones3318
peterh
skriefal
arledgsc
Sprags
ruffian
Luddite
Roy Mottram
Maintarget
baddog1946
Bob Latino
corndog71
ramon68
sKiZo
18 posters

    Custom Chassis?

    sKiZo
    sKiZo


    Posts : 1530
    Join date : 2013-04-01
    Location : Michigan USA

    Custom Chassis? Empty Custom Chassis?

    Post by sKiZo Sun Apr 21, 2013 1:33 pm

    Looking at doing a custom chassis for an ST-120. The Dynaco clone box just hasn't got enough room for all I want to do with it. Yah ... I know ... why do it?

    Because I can!! AhahahhaHAHHAHAHAHAAaaaaa!! bom

    Anyway, here's the concept. All one panel for the top, front, and back, with wooden sides.

    Custom Chassis? FPD15-panel

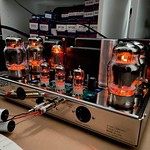
    - Panel dimensions are expanded to 13x13 for the top. Front and back are 3 inches. The TungSol KT120 drivers are pretty tight together on the stock chassis, and this should allow better cooling. I'll be doing a perf panel on the bottom so there should be decent enough "chimney effect" around the glass. Theoretically of course.

    - Chromated aluminum, so it should shine with a bit of polishing. Should be right purty when the lights go out.

    - The sides of the panel will be inset into the wood for a clean seam, and I'll add copper plated phenolic board to complete the "envelope" which should keep the chassis quiet. Theoretically of course. I'll run threaded rod stock with blind caps side to side to hold the wood to the case.

    - I'll be moving the quad cap inside (plenty of room now - heck, I'll even be able to put the chokes in straight! tongue

    - The rectifier is moved to the center, and I left enough room for a BIG bottle if I go that route. I figure on using a Philips 5R4GYS. That should look right at home with the KT-120 drivers, and it SHOULD work with the amp. Theoretically of course. Wink

    - The front panel will include two bias gauges, mono and power sliders, and separate volume controls for each channel. Got a couple real nice Mallory 50K pots looking for a home. I'll also have the usual bias test points on the top of the panel, but may be able to get away with just the meters. They're a decent size scale and supposed to be pretty accurate.

    - The rear panel will have the input jacks (two sets, bridged, so I can do an internal loop to my Sansui quad which will be used as a pre-amp.

    The entire panel pictured would be CNC cut as one piece at a gawdawful ridiculous price, and they don't do bends. That's what the line of oblong cutouts at the front and back of the "top" are for. That should make it easy to bend the panel by hand to what I need - a square corner for the back, and an angle yet to be determined to slope the front. I'll play that by ear when I'm cutting the wood sides.

    So ... waddaya all think? Suggestions, comments, belly laughs? Still thinking out loud here, and the design is easy enough to change. Did I forget anything?
    avatar
    ramon68


    Posts : 118
    Join date : 2009-04-12
    Age : 83
    Location : naples fl

    Custom Chassis? Empty Re: Custom Chassis?

    Post by ramon68 Sun Apr 21, 2013 1:51 pm

    Great idea. I've always thought the 120 needed a more spacious layout. It'll be fun to see what people suggest.
    sKiZo
    sKiZo


    Posts : 1530
    Join date : 2013-04-01
    Location : Michigan USA

    Custom Chassis? Empty Re: Custom Chassis?

    Post by sKiZo Sun Apr 21, 2013 2:27 pm

    I'll find out how great an idea it is when I get around to building it. Some of the wires might end up a bit short, but no problem splicing as needed. I'm also thinking of clipping the transformer leads fairly close to the bodies and going with cloth wire for the old school effect. Not TOO close as I wouldn't want to chance screwing up - those transformers aren't cheap! I got some tinned stranded in various colors that would look real nice under the hood.

    Old trick for cloth wires. Leave enough of a tail to grab onto, and slice the cloth with a razor blade. You can then drag the cloth back over the wire a few inches, enough to cover a splice and dress any remaining plastic wire. Once the wire is spliced, just drag the cloth jacket back over the nasty looking bits.

    Bob - tell your transformer guys to start using cloth wires!!

    Still debating the lines of oblong holes at the bend points, but ... doing it this way doesn't leave me at the mercy of a local shop screwing it up, and allows me to fudge the panel to the wood sides if needed. The ones at the back could indeed be handy for additional ventilation for the transformers.

    Also worth mentioning. The panel is 2.5mm thick. They go up to 4mm, but I think the smaller gauge should be fine for supporting the transformers. I could always beef that section up a bit if needed.

    Oh. Just to double check - Pentode IS towards the transformer?

    Custom Chassis? Pt-switches

    Oh again. Here's a mockup of the front panel.

    Custom Chassis? FPD14-front-panel

    PS ... in case anyone is wondering, I didn't include all the mounting holes in the template. Like for tube sockets, switches, and such. I figure that saves some bucks on CNC, and also allows me some fudge factor on assembly. I've got a drill press and it'll be easy enough to make clean holes for that kind of stuff that are an exact match to the component. I suppose I could also do the ventilation holes, but those won't be covered and the CNC can do a much cleaner job, including radiusing the edges.
    corndog71
    corndog71


    Posts : 840
    Join date : 2013-03-19
    Location : It can get windy here

    Custom Chassis? Empty Re: Custom Chassis?

    Post by corndog71 Sun Apr 21, 2013 2:36 pm

    I'm also working on my own layout for an ST120. Not as ambitious as yours. I'm sure yours will look fantastic. But yeah, I too find the dynaco chassis far too limiting.
    Bob Latino
    Bob Latino
    Admin


    Posts : 3262
    Join date : 2008-11-26
    Location : Massachusetts

    Custom Chassis? Empty Re: Custom Chassis?

    Post by Bob Latino Sun Apr 21, 2013 4:10 pm

    Re: > "Bob - tell your transformer guys to start using cloth wires!!"

    In time any coloring put into a cloth lead WILL fade to the point where the actual color of the lead may be difficult to determine. On the original Dynaco output transformers those cloth leads (especially the BLUE/WHITE and GREEN/WHITE) will fade to the point where it is near impossible to tell these two leads apart. Many a Dynaco tube amp rebuilder has taken the amp apart and then not been able to SEE the color difference between these two wires. If this ever happens to you during a rebuild, all you have to do is measure the resistance from the RED lead on the output transformer to both the BLUE/WHITE and the GREEN/WHITE. The RED to BLUE/WHITE (the plate lead) resistance will always be higher than the resistance from the RED to the GREEN/WHITE (ultralinear screen tap) lead.

    Another thing you can do if you are ever unsure of the wire color on a cloth lead transformer is to remove the bottom cover (power transformer) or the side covers (output transformer). Under the transformer cover the true color of the wire will show with maybe just a little fading.

    The VTA power and output transformers come with irradiated PVC wire insulation which will not fade. We won't be changing to cloth lead wires.

    Braided cloth lead wires are also a pain to strip. If you use a standard wire stripper, you nearly always wind up with a few threads from cloth lead hanging out. Then you have to reach for a single edged razor or a utility knife to cut away all the threads.

    Bob


    RE: > "Oh. Just to double check - Pentode IS towards the transformer?"

    Yes - If the triode/pentode ultralinear switches are wired as shown in the manual, the switch handle (toggle) will be facing towards the power transformer when the amp is in pentode/ultralinear mode.
    sKiZo
    sKiZo


    Posts : 1530
    Join date : 2013-04-01
    Location : Michigan USA

    Custom Chassis? Empty Re: Custom Chassis?

    Post by sKiZo Sun Apr 21, 2013 5:13 pm

    corndog71 wrote:I'm also working on my own layout for an ST120. Not as ambitious as yours. I'm sure yours will look fantastic. But yeah, I too find the dynaco chassis far too limiting.

    And besides ... it's more fun this way!

    I stole the basic layout from here ...

    http://wardsweb.org/audio/ST70/

    Only thing different on the tube locations is spreading them out a bit more for the big bottles. I also wanted better clearance between the big rectifier and the power transformer to minimize heat transfer one way or the other.

    I may also steal the round look to the sides. Not sure about that. Maybe leave it rounded towards the front and chop it at the back. My chassis will be an inch or two taller also and have a basic "stick" front and back to trap and edge the custom panel. Haven't settled on wood yet, but my local lumber guy has furniture grade walnut and oak - both great grains.


    sKiZo
    sKiZo


    Posts : 1530
    Join date : 2013-04-01
    Location : Michigan USA

    Custom Chassis? Empty Re: Custom Chassis?

    Post by sKiZo Sun Apr 21, 2013 5:28 pm

    Bob Latino wrote:

    The VTA power and output transformers come with irradiated PVC wire insulation which will not fade. We won't be changing to cloth lead wires.

    Braided cloth lead wires are also a pain to strip. If you use a standard wire stripper, you nearly always wind up with a few threads from cloth lead hanging out. Then you have to reach for a single edged razor or a utility knife to cut away all the threads.

    I can certainly understand why it wouldn't be all that popular with the kit crowd looking for ease of assembly.

    Stuff I got is lacquered and doesn't shred or shed as much as the old stuff did. I slipoed a few inches down the wire as a test and it just sorta bunched up like a donut, then flattened out again nice and clean so's you wouldn't even notice it'd been messed with. They also sell it in shorter lengths - most anybody else wants you to buy a big reel of the stuff.

    http://www.radiodaze.com/category/301.aspx

    Isn't supposed to fade out as bad either. Still a PITA to cut a clean edge, but I think the look is worth it. Bend the wire over and kinda saw the cloth carefully at the top of the bend with a razor blade, and work your way around. A little practice and you don't even nick the insulation. A touch of white glue to dress the edge keeps if from unraveling. I'd be leaving the tails plenty long at the transformer for access to the original color code.

    Holy cow ... that IS a lot of work. Maybe I just talked myself out of it. tongue
    baddog1946
    baddog1946


    Posts : 319
    Join date : 2010-02-03
    Location : Costa Rica

    Custom Chassis? Empty Re: Custom Chassis?

    Post by baddog1946 Sun Apr 21, 2013 6:41 pm

    Hi Kizo:
    Nice layout!
    Last year I made four ST-70/120 amps with custom all one piece and bent front and back aluminum chassis I got from Front Panel Express. The first two were the bent plate models but I finally went to an all wood base with a flat top plate and inset the front and back aluminum panels into routed wood openings. I assembled the top plate and the sides as a combined step to hide the top's edges which looks cool. I changed to this format for reasons I will explain below in this post.

    When I made the first two amps you see in the pictures on the photobucket link below I learned a lot about custom aluminum chassis building with 2.5 mm. aluminum stock from front page express. Maybe you can save yourself some $$ and headaches from my experiences.
    The other pic is a Google Sketchup model of a 160 watt amp that I am still finishing up the wiring on. I moved on from that bent plate format as well before I actually ordered the bent plate to the flat plate type I mentioned.
    This final amp also has its roots in the Dynaco design tradition with a ton of mods. I will post a pic of the final chassis design I settled on tomorrow on this thread.
    Ok onward and upward.
    There are some expensive pitfalls to avoid with bent plate chassis so here is some humble advice on the bent aluminum chassis program.

    1.On the 2.5 thickness stock Unless you have FP Express cut the back side on the bend lines when you bend it for sure it will have some visible stress lines on the top side that are ugly even if you do it in a sheet metal brake. Problem here is it is expensive for these cuts but worth it IMHO.
    For sure get it bent with a proper sheet metal brake at a sheet metal shop it's also well worth it. The Wards web amp is a steel plate and steel does not have this problem.
    Also make sure the back cuts are not too deep or the plate will crack on the bend line. I am making another plate plate amp sometime in the future from a cracked plate that was cut too deep. 1mm.(less than half the thickness is all you need here.

    2. You also need to be super careful with the holes alignment the way you have it now with separate holes for the driver tubes and the bias pots is tricky to get them centered exactly and they have no adjustment once soldered on the board.
    Each board ends up a little different after it is soldered believe me. Just using a blank board for the template may still yield some unsightly misalignment.
    I got some improved results for the bias pot holes on (#3) by making them round and offsetting the board about 1/2" deeper so only the tube glass stuck up into holes not the bases.
    There was still a tiny bit of of deviation with the bias pot screws when viewed from directly above but at even a slight angle this was not visible. I also made the tube holes bigger to allow for heat dissipation and it also allowed some wiggle room as well for the tubes to be moved a bit to look exactly aligned.
    For the last ST-70/120 type (#4) I did it a little differently with the drive tubes and bias pots in a single cutout (see the Google sketchup pic) and it was easier to get the tubes and pots looking perfectly centered in the hole. Drilling the mounting holes later is a very good idea. I used this technique on #4 and the 160 watt amp and it works fine.
    As far as component spacing goes be careful here too. A small change here makes a huge difference in real life. On my first 2 amps I had the spacing it a little too big and the various parts looked a bit lonely.
    I downsized slightly for the last amps using a cardboard template to stick the pieces on for a look at reality. I think I have it right now but this is a matter of taste. You can actually do the whole chassis like this and get it exactly the way you want. It always looks different than on the FPE program.
    That's my 2 cents worth hope it helps.
    BTW
    If you have enough room you should use Triad C-17-X chokes they don't fit in a stock chassis (too tall) but if you have the room they were recommended to me by Bob and I think they are worth it (thanks Bob!). not much more expensive either.
    Nice to see some interest out there for new chassis concepts. Good luck with your project.
    Baddog
    sKiZo
    sKiZo


    Posts : 1530
    Join date : 2013-04-01
    Location : Michigan USA

    Custom Chassis? Empty Re: Custom Chassis?

    Post by sKiZo Sun Apr 21, 2013 7:33 pm

    Now THAT's what I'm talkin'bout! Real world experience!

    I'm using the Front Panel Express software here for design. Got my handy micrometer and calipers for sizing stuff and then added a bit where possible for fudge factor. I also printed up templates and went as far as cutting holes and such to dry fit the components. Used the OEM Dynaco chassis as a guide too, so I'm fairly certain I'm good to go. I also checked the laser printer for accuracy, so the templates are all to scale.

    On the bends - I'm hoping for the best there. The cutouts are spaced with 15mm of metal between them. I figure if I clamp the panel with the oblong cutouts centered properly, and just bend it slowly over a piece of 2x lumber stock, that should give me a nice radius. After all, I won't be bending that much metal. Not going for an extreme sharp corner, which I think helps a lot in this case. In this case, I expect back cuts would actually work against me. Have to think on that.

    (And you can always say I told you so when it goes horribly wrong) affraid

    Worse comes to worse, I can always flatten them out again and have a local shop cut it and go with the wood corners like you did.

    2. You also need to be super careful with the holes alignment the way you have it now with separate holes for the driver tubes and the bias pots is tricky to get them centered exactly and they have no adjustment once soldered on the board.

    Word. I built the driver board and used that for a guide. Did the cutouts on a cardboard template and that drops on real nice. I originally went with the holes all around each tube like with the biguns, but the template pointed out some issues with that, hence the crescent cutouts. I also went oversize on the bias adj holes and will do the mounting holes on the fly once I get the chassis plate. I expect to add spacers to the mounts so the socket tops are even with the chassis top.

    One thing surprised me on the FPE software ... no tube templates? I also see no way to share those. I ended up making a "user macro" for the octal tubes and just plopped that down on the design as needed. That way I know if one fits, they all fit. Then again, if one doesn't fit, they all doesn't fit, right? Sized the octals at 28mm and I was also careful to make sure the ventilation holes wouldn't get in the way of the socket mounts. Once again, I'll drill the mount holes when I like ... mount them.

    As far as component spacing goes be careful here too. A small change here makes a huge difference in real life. On my first 2 amps I had the spacing it a little too big and the various parts looked a bit lonely.

    Trickiest part really was the rectifier. I planned for the biggest baddest bottle I could find and still leave plenty of clearance for ventilation. Got the word that a Philips 5R4GYS should work.

    Custom Chassis? Nos_76262

    Same with the output tubes ... those TungSol KT120's are freakin' HUGE ... not all that worried about them looking lonely ... the rectifier also stands over 5 inches tall, so it shouldn't get lost amongst all the big trees.

    If you have enough room you should use Triad C-17-X chokes they don't fit in a stock chassis (too tall) but if you have the room they were recommended to me by Bob and I think they are worth it (thanks Bob!). not much more expensive either.

    Good tip! Are these the ones? Purty lil thangs, but Mouser tends to play fast and loose with pictures.

    Custom Chassis? Fit804Custom Chassis? 70218146_large

    I'm thinking it's more like the pic on the right. What should I expect in the way of improvement? Cleaner, crisper sound? More bass? Will my farts smell better? tongue

    Oh. Thanx, Bob!

    PS ... so you think 2.5mm is fine for the metal? I was wondering if that's strong enough to support the transformers ... I could always add a reinforcement plate back there if it was an issue ...
    baddog1946
    baddog1946


    Posts : 319
    Join date : 2010-02-03
    Location : Costa Rica

    Custom Chassis? Empty Re: Custom Chassis?

    Post by baddog1946 Sun Apr 21, 2013 9:29 pm


    Oops!!
    I didn't get the photobucket address in my cut and paste. Sorry about that. Here it is:

    https://s1212.photobucket.com/user/baddog1946/library/Custom%20chassis?sort=3&page=1
    baddog1946
    baddog1946


    Posts : 319
    Join date : 2010-02-03
    Location : Costa Rica

    Custom Chassis? Empty Re: Custom Chassis?

    Post by baddog1946 Sun Apr 21, 2013 9:36 pm

    P.S.
    2.5 is thick stuff and extremely stiff, good luck bending it over a piece of wood. I doubt you can do it like that.
    BD
    sKiZo
    sKiZo


    Posts : 1530
    Join date : 2013-04-01
    Location : Michigan USA

    Custom Chassis? Empty Re: Custom Chassis?

    Post by sKiZo Sun Apr 21, 2013 11:14 pm

    I was just watching YouTube where a guy was planing the thickness of an aluminum plate with a router using a flat end carbide bit. Quarter inch bit would be perfect for making the bends easier. Not sure how the chromating factors in. Have to play that by ear.

    Only caveat is to clamp everything down well, use a guide, and take many passes at a max cut of .02mm per pass. Do that on the inside surface of the chassis plate and I'd think it'd make for a nice clean and easy bend. Doing it that way, I can even eliminate the oblong holes I'd been planning on to make it easier to bend. About half the 2.5mm thickness should do it ...

    Make pass, drink a beer, repeat as necessary. 99 bottles of beer on the bench, 99 bottles of beer! drunken

    Not worried about structural strength at the joint. The wood sides will trap the chassis plate and stiffen things up.

    Like the shape of the wood panels you used in your mockup, especially the cutouts for legs. Have to play with that. Only difference is mine will also have wood runners at the base of both the front and back for additional height. Join it all with glue and pocket screws for clean, strong corners.

    FYI ... just deleted the rows of oblong holes at the bend locations and saved $17. Another nice feature of the FPE software - just click the "order" button, and you know exactly how poor it's gonna make you without having to wait for a quote. Kewl!


    Maintarget
    Maintarget


    Posts : 227
    Join date : 2013-02-10

    Custom Chassis? Empty Re: Custom Chassis?

    Post by Maintarget Mon Apr 22, 2013 12:01 am

    I'm building an ST 120 in a more spacious enclosure using all parts supplied by Bob with upgrades, my layout and thoughts are very similar to yours I used some 1/4" scale graph paper and tried different layouts and sizes moving things around until I found what looked right and would physically work.
    As for the aluminum what grade are you using?
    I'm using .090" #3003 H03 this grade of aluminum is easily drawn, shaped and bent, using a large radius on your bends is a good idea, clamp securely between a 2"x4" using C clamps on a wood or metal table edge and bend the sheet using small even blows using a rawhide mallet or piece of wood working from one end to the other bending slowly until you get the desired bend, if you are going for a 90 degree bend you will probably have to make the last final bend by moving the 2"x4" back from the radius.
    If you have a harder grade aluminum you can anneal the area were you want the bend by using an gas welder with the flame set to a carbonizing flame, (this will appear to be real black sooty smoke because you using more acetylene than oxygen) hold the tip away from the metal about 8" and cover the area in soot moving back and forth, remember your not trying to over heat the metal just warm it up and cover in soot so it doesn't take muchCustom Chassis? Chassilayout_zps88f2cd37.jpghttps://s1325.photobucket.com/user/RoscoeAJones/media/Chassilayout_zps88f2cd37.jpg.html?sort=3&o=3.
    Once you do this the aluminum will bend easily after air cooled and you will need to clean.
    sKiZo
    sKiZo


    Posts : 1530
    Join date : 2013-04-01
    Location : Michigan USA

    Custom Chassis? Empty Re: Custom Chassis?

    Post by sKiZo Mon Apr 22, 2013 12:55 am

    What are the dimensions of said spacious enclosure? A lot of mine goes towards spacing out those enormous KT-120 power tubes. A standard tube set could be condensed quite a bit and still maintain the same relative distance between bottles. The extra height should also increase chimney effect airflow over the tubes - don't forget to add plenty of venting.

    For material, the spec sheet from FPE lists:

    Width: 330mm, Height: 480mm, Thickness: 2.50mm, Material: Aluminum anodized/chromated, Color: Natural

    Whatever that means. Doesn't list a specific grade. Not a metal man myself, although I'm handy with a cutter and a torch. I just wait for somebody to hand me something and ask "cut it or burn it or both?" tongue

    So, is 2.5mm thickness too much? The FPE software objects to anything thinner due to the size of the panel, and what with the weight of the transformers it seemed like a good idea anyway. It converts to .098, so that's real close to what you're using. I did get a popup when I tried going down to 2mm thickness saying they'd rather not, but could if I really really wanted to go that route.

    My thought on the bends is that not only would a gradual bend with around a quarter inch radius be easier, it'd also be a more fluid looking design than a sharp corner. I'll play with the angle on the front panel before locking it in, but that will also be more of a rounded transition.

    I shot an email to FPE for their take on how the thinning thing would work. Their metal after all. They may be able to do it there - realistically, there's not a whole lot a CNC setup can't do. Hardest part might be figuring out how to charge it, but that's the bean counter's problem. I also have concerns about the "chromating". I do know chromium is brittle, but I expect their coating can take it. Not sure if annealing is in the cards either as that could discolor the surface - not a good thing as the only thing I expect to do with it is give it a good polish.

    Very nice artwork you got there ... I'd try it, but probably end up poking my eye out with a pencil. I feel much safer using software. If you want to give FPE a try, it's really fairly easy to use once you get the hang of it, and better yet, it's free!

    http://www.frontpanelexpress.com/

    Also lets you export to DXF, so you can take a basic design and go right to town with it using premium cad and design packages.

    PS ... going with the OEM Dynaco test sockets or what? I found the individual jacks at Weber Speakers if you decide to go small. The Velleman meters I got are supposed to be quite accurate and have a nice big scale to read, but I'm gonna add the test jacks at each bank too. Easy to install and they don't take up much room, and be nice to double check and fine tune with a good VOM also.

    Oh. And don't forget to upgrade the chokes! Very Happy

    EDIT > > Before I forget, I read that using a three wire power cord can cause hum on these amps. Jot your self a note just in case. If you do have a problem, just float the third wire.
    sKiZo
    sKiZo


    Posts : 1530
    Join date : 2013-04-01
    Location : Michigan USA

    Custom Chassis? Empty Re: Custom Chassis?

    Post by sKiZo Mon Apr 22, 2013 6:00 pm

    OK then ...

    Just got off the line with FPE and there's a simple solution to the bending thing right in the software without having to jump thru a lot of hoops. You can add a CAVITY to the back side of the panel and adjust that to the full width of the blank. Their suggestion was to go with 2mm depth on the cavity, but that would only leave 0.5mm of metal. I'll feel more comfortable with a bit more meat and go for 1.0mm thickness after the planing. Should still bend easily enough.

    Custom Chassis? FPD18-rear-bend

    They said that at my original quarter inch width, there might be stress marks at the bend, so I increased that to a half inch for a more gradual radius. I also added some slots along the length, so if it does distort a little, those should draw the eye away, and bonus, provide more ventilation for the transformers.

    Bend for the front panel is the same, only without the slots. Shouldn't be an issue as I'm only bending that maybe 30 degrees for a sloped panel.

    Hazzah ... running out of excuses to put off the order. This is turning out to be a fun little project.
    Maintarget
    Maintarget


    Posts : 227
    Join date : 2013-02-10

    Custom Chassis? Empty Re: Custom Chassis?

    Post by Maintarget Mon Apr 22, 2013 10:19 pm

    sKiZo,

    I added 1" to both the depth and width and 1 1/4" to the height so not a radical difference from stock enclosure just a little more room for relocating the quad cap and rerouting power switch wiring to front and input to rear.
    Another option for achieving a smooth large radius is to bend metal over a pipe of the desired radius the option for radius size are almost limitless.
    Thanks for the link to front panel express interesting may try in the future as my time is very limited (Dam job always gets in the way Evil or Very Mad LOL)
    I ordered the same single pin bias sockets used for the M 125 mono blocks and plan to install flush under top panel, screw driver access will be through a small hole.
    I'm really excited to move on the the next phase of the project building of the enclosure.
    Thanks for the heads up on the up grade chokes and the grounded power cord
    Maintarget
    Maintarget


    Posts : 227
    Join date : 2013-02-10

    Custom Chassis? Empty Re: Custom Chassis?

    Post by Maintarget Mon Apr 22, 2013 10:41 pm

    So what are the benefits of up grading the the C 17X Chokes??
    sKiZo
    sKiZo


    Posts : 1530
    Join date : 2013-04-01
    Location : Michigan USA

    Custom Chassis? Empty Re: Custom Chassis?

    Post by sKiZo Mon Apr 22, 2013 11:41 pm

    I was figuring on using a roundover bit in my router to radius a board and use that for a guide on the bends. Should work, and even allow me to do a bit of gentle forming with a composite hammer and dolly if needed. Fairly certain it'll bend nicely without a lot of persuasion. Once formed, I'll attach the wood sides and finish the enclosure before building the electrics. Wouldn't want to take a chance on flexing the metal any more than necessary.

    ******

    Way I understand it, the chokes are all about filtering AC noise from the audio output. The chokes provided with the kits are a bit of a compromise due to space limitations in the Dynaco chassis. Get rid of the size limitation, and you can move up to a better and quieter choke, as long as it's electrical characteristics still work with the design and current. You also need a certain amount of saturation within tolerance one way or the other or the choke won't work right. The Triad is a "smoothing" choke design which requires bigger iron. Not sure about the ones that come with the kits.

    Anyway, makes an extra $40 sound like a pretty decent investment then.

    I found this too ...

    https://dynacotubeaudio.forumotion.com/t1091-st-120-choke-substitution?highlight=choke


    Bob Latino
    Bob Latino
    Admin


    Posts : 3262
    Join date : 2008-11-26
    Location : Massachusetts

    Custom Chassis? Empty Re: Custom Chassis?

    Post by Bob Latino Tue Apr 23, 2013 10:01 am

    Re: > "Way I understand it, the chokes are all about filtering AC noise from the audio output. The chokes provided with the kits are a bit of a compromise due to space limitations in the Dynaco chassis. Get rid of the size limitation, and you can move up to a better and quieter choke, as long as it's electrical characteristics still work with the design and current. You also need a certain amount of saturation within tolerance one way or the other or the choke won't work right. The Triad is a "smoothing" choke design which requires bigger iron. Not sure about the ones that come with the kits."

    The chokes supplied with VTA amp kits are not a COMPROMISE. Yes - there is limited space inside the chassis. Using TWO C24-X chokes gives two advantages over the single larger C17-X choke. (1) The single C17-X choke is rated at 300 milliamps while TWO C24-X chokes are rated at 480 milliamps. (2) Each choke is on opposite sides of the chassis (to dissipate heat better) and each one handles only 1/2 the amount of current and each one will run cooler than a single C17-C choke. Re: "Moving up to a better and quieter choke". A larger choke or using two chokes instead of one does not guarantee (or for that matter give) a "quieter amp". If that were true then the VTA ST-120 with TWO chokes would be quieter than the VTA ST-70 which has only ONE choke. The VTA ST-70 and the VTA ST-120 with the stock layout of parts have been tested for noise and both have about a -90 dB signal to noise ratio. The two chokes as used in the VTA ST-120 do not give a lower noise level than the VTA ST-70.

    Bob
    sKiZo
    sKiZo


    Posts : 1530
    Join date : 2013-04-01
    Location : Michigan USA

    Custom Chassis? Empty Re: Custom Chassis?

    Post by sKiZo Tue Apr 23, 2013 2:13 pm

    Thanx for the clarification.

    OK then ... From reading BadDog's post, I was under the impression that the plan was to use TWO of the larger C17X chokes as one to one replacements for the C24X chokes that come with the kit?

    And brings us back to the question of why and what benefits might be gained. I'll have plenty of room in the custom chassis ...

    (And I've already ordered two of the C17x, so even if there's no discernable difference, would it hurt to do the one to one swap?)

    Regarding the chassis ... I've managed to bump the fabrication price for the panel up to around $200 with all the fiddlybits!! Whoa - Big chunk o'change there! Did some digging and the aluminum MainTarget recommended AND a full set of decent stepped drill bits would set me back around $60. If it all goes south, I'd only be out around $30 for the metal as the bits are handy to have in the shop anyway. My time playing with the FPE software won't be wasted either - that allows you to print full size layouts and I can use that to transfer the drill centers to the metal, then have at it with the drill press and dremel. And there's the challenge of doing it myself, which is half the fun. If it works out, I can take the money "saved" and spend it on tubes!


    Bob Latino
    Bob Latino
    Admin


    Posts : 3262
    Join date : 2008-11-26
    Location : Massachusetts

    Custom Chassis? Empty Re: Custom Chassis?

    Post by Bob Latino Tue Apr 23, 2013 3:28 pm

    It won't hurt to swap TWO C17-X chokes for TWO C24-X chokes if you have the deeper chassis. A larger chassis will spread the components out a bit and the amp should run a little cooler with an enlarged chassis.

    On your layout with the input jacks on the rear of the amp, I would suggest running shielded cable to both input jacks and maybe even running the shielded cable around the sides of the amp to keep the two input cables away from the power transformer as much as possible. On the stock layout the input jacks are on the front and there is only a 1 3/4 inch piece of wire from the input jacks on the front face of the amp to the input eyelets on the driver board. This wire run is so short and the since power transformers is on the opposite side (rear) of the amp that the amount of EMI radiated by the power transformer that reaches these input wires on the stock ST-70/ST-120 layout is almost nothing.

    EMI (electromagnetic interference) decreases with the square of the distance. On a stock ST-70 the center of the power transformer is about 8 inches away from the imput jacks. If your input jacks are only 2 inches away from the center of the power transformer then the amount of electromagnetic energy that reaches the input jacks will be 8/2 which is 4. The 4 is then squared = 16 times greater EMI that you will have to deal with with the input jacks on the rear.

    Bob
    sKiZo
    sKiZo


    Posts : 1530
    Join date : 2013-04-01
    Location : Michigan USA

    Custom Chassis? Empty Re: Custom Chassis?

    Post by sKiZo Tue Apr 23, 2013 4:09 pm

    Kewl ... er ... kewler! I was figuring the larger chokes would heat less ...

    Got some of this for all the audio signal wires ...

    Custom Chassis? 5604

    Nice stuff. Mogami twisted pair 22 guage with the extra shielding. I also figure to do a metal box around the jacks for additional isolation and solder the extra shield directly to that. Total exposure shouldn't be any worse than the stock setup with the jacks on the front. In case you were wondering, the two sets of jacks will be in series so I can do a full tape loop connection to my receiver preamp without having to do a "Y" adapter ... be a simple cable swap from my current amp to be up and running.

    Custom Chassis? Tapeloop-mc2205

    Also playing with the idea of going full isolation on the ground and a three wire plug. I've got some 8x12" copper phenolic plate that I can sandwich against the underside of the chassis. Hook all the circuit grounds to that and then run the third wire on the AC plug directly to the chassis. Not sure what all I'd accomplish electrically, but that copper would sure look nice under there. Theory is it would minimize any chance of hum going with the three wire AC plug. I've also got a bunch of non-grounding solder posts for routing wires and stretching transformer leads if needed.
    sKiZo
    sKiZo


    Posts : 1530
    Join date : 2013-04-01
    Location : Michigan USA

    Custom Chassis? Empty Re: Custom Chassis?

    Post by sKiZo Tue Apr 23, 2013 7:35 pm

    Well, had a cheep attack and am going to try the DIY approach to making the panel. I mean, what's the worse that could happen.

    (Oh ... the humanity. Film at 11)

    I split off the back panel as I figure bending that back corner would be a bit more than my garage shop could handle. I'll go with a full height wood panel back there and cut it out for a metal insert for the doodads. Squeezed all those together to allow for the wood cutout approach. I'll still go with the sloped panel for the front controls. That should be easy enough as it's not much of a bend.

    Also took Bob's advice to heart about the RCA jacks and shuffled those to the sides to keep them away from the power transformer. I also split the panel into two sections. Also gone are the crescent shaped cutouts around the driver tubes. I increased the hole size to 28mm (same as the power tubes) and should get plenty of chimney effect right thru those. One other detail was adding the holes for the bias test points alongside the power tubes.

    Custom Chassis? FPD20a-panel

    Gotta love the software approach ... took maybe fifteen minutes to make all the changes. I almost feel guilty now using the FPE software seeing that I won't be ordering from them. Maybe just get a dress up panel for the front somewhere down the road.

    Oh. Notice the reference center points. Those will come in REAL handy at the drill press.
    Roy Mottram
    Roy Mottram
    Admin


    Posts : 1839
    Join date : 2008-11-30

    Custom Chassis? Empty Re: Custom Chassis?

    Post by Roy Mottram Tue Apr 23, 2013 8:56 pm

    nice work on the various amp chassis guys! slightly off topic, but just wanted to show more photos of my latest SP14 preamp chassis
    on that other thread,
    https://dynacotubeaudio.forumotion.com/t1646-new-style-sp14-chassis
    so make any comments about it on the other thread
    sKiZo
    sKiZo


    Posts : 1530
    Join date : 2013-04-01
    Location : Michigan USA

    Custom Chassis? Empty Re: Custom Chassis?

    Post by sKiZo Tue Apr 23, 2013 11:00 pm

    You're a bit farther along than I am ... Wink

    I do like the look of the tubes though. I mentioned earlier adding spacers to drop the driver board, but I may make those a bit longer to hide the sockets completely.

    Been looking around for some trimmer pots that I can mount right to the chassis plate so I don't have to go digging inside with a screwdriver. These should work?

    Alpha 50KA / A50K Pot potentiometer 15mm 1/4W
    Custom Chassis? !BjswMLgBmk~$(KGrHqUOKikEsnzBhq-(BLUuLJdOCg~~_12

    Wondering how long I could stretch the leads from the VTA board? Doesn't seem like location would be all that critical. I've got some ribbon cable that would be tidy for that. Be perfect if I could locate the pots along the left and right sides of the chassis outside the power tubes, right by the test points. No singed fingers that way. Maybe even put them on the front panel between the meters ... they're small enough ...

    Sponsored content


    Custom Chassis? Empty Re: Custom Chassis?

    Post by Sponsored content


      Current date/time is Thu Apr 18, 2024 11:06 pm