The Dynaco Tube Audio Forum

Would you like to react to this message? Create an account in a few clicks or log in to continue.
The Dynaco Tube Audio Forum

Dedicated to the restoration and preservation of all original Dynaco tube audio equipment - Customer support for Tubes4hifi VTA tube amp and preamp kits and all Dynakitparts.com products


+10
Cubdriver
Roy Mottram
arledgsc
ruffian
BNR_1
Laminarman
kygeezer
sKiZo
Zimmer64
pigface
14 posters

    My new Sp14 build

    avatar
    pigface


    Posts : 85
    Join date : 2011-04-10
    Location : pittsburgh

    My new Sp14 build Empty My new Sp14 build

    Post by pigface Wed Jan 01, 2014 3:48 pm

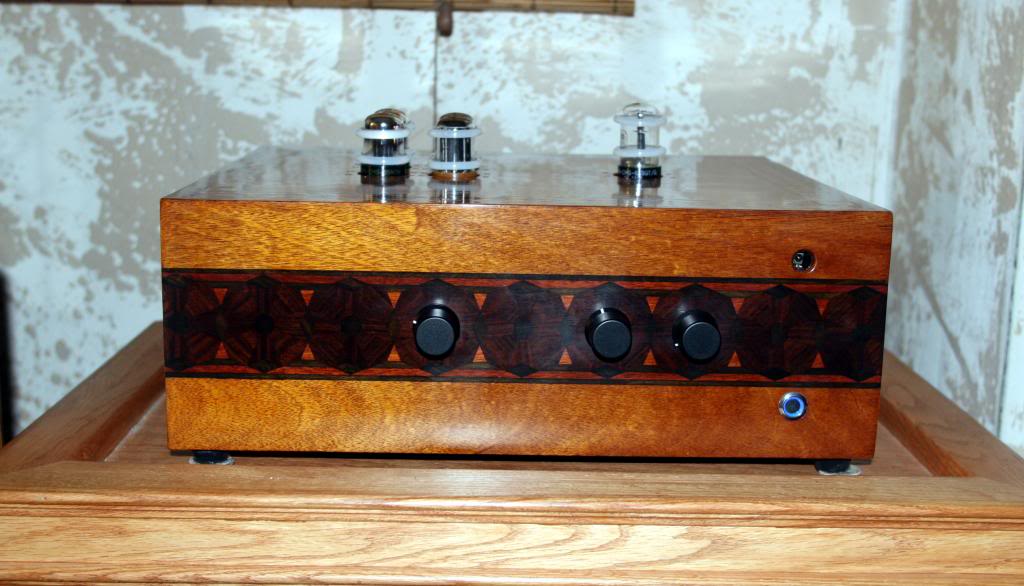
    I like the sound of my other SP14 so much  I decided to build one for my main listening room .  So far I  only have the cabinet close to being finished .  
    I'm still waiting on some parts for the build . So it will probably a few weeks yet  until it's all together .
    Here are a couple pics of the almost finished cabinet .  It's going to have exposed tubes , an extended kit on the selector switch , a remote controll volume and some "boutique " capacitors and resistors.

    Here are some of  the many parts , I'll list them as I go along .
    My new Sp14 build SP14parts1

    My new Sp14 build SP14parts2

    I'll try to post a link to all the cabinet build pictures  later  for anybody interested .

    My new Sp14 build SP14cabinet39

    My new Sp14 build SP14cabinet41

    My new Sp14 build SP14cabinet38

    My new Sp14 build SP14cabinet40

    After a couple weeks of work I think it has turned out  nice so far . It needs some sanding and polishing yet .


    My new Sp14 build SP14cabinet02

    Some mock up , trying to figure out where everything fits .

    This is a glass "window" for the remote eye for the volume . ( Goes in the upper right hole in the front )
    My new Sp14 build SP14cabinet06

    I've changed my mind on the champagne knobs and orderded some black ones .
    My new Sp14 build SP14cabinet08

    My new Sp14 build SP14cabinet09

    My new Sp14 build SP14cabinet03

    My new Sp14 build SP14cabinet27

    My new Sp14 build SP14cabinet28

    My new Sp14 build SP14cabinet30

    My new Sp14 build SP14cabinet31

    My new Sp14 build SP14cabinet14
    Zimmer64
    Zimmer64


    Posts : 123
    Join date : 2013-01-29
    Age : 60
    Location : Switzerland

    My new Sp14 build Empty Re: My new Sp14 build

    Post by Zimmer64 Wed Jan 01, 2014 5:08 pm

    Very nice wood work! How did you do the inlays? I am doing a bit of wood work myself, but not anywhere near your level of skill. Good stuff.

    Michael
    sKiZo
    sKiZo


    Posts : 1530
    Join date : 2013-04-01
    Location : Michigan USA

    My new Sp14 build Empty Re: My new Sp14 build

    Post by sKiZo Wed Jan 01, 2014 5:49 pm

    Woodburning, stencils, and dyes?

    (oh my ...)

    Beautiful work so far ... I've been looking into one of those myself and will be taking some notes if yall don't mind.
    avatar
    kygeezer


    Posts : 51
    Join date : 2012-11-30

    My new Sp14 build Empty Re: My new Sp14 build

    Post by kygeezer Wed Jan 01, 2014 5:53 pm

    You guys with the great woodworking skills make me sick! (with jealousy!)  What an unusual build with the inlay etc.  I guess your first SP14 looks pretty shoddy next to this one.  If you are so ashamed of it you want to throw it away, please throw it in my direction for proper disposal!  
    That is display quality for sure.  What a beautiful build!
    avatar
    Laminarman


    Posts : 110
    Join date : 2009-12-30

    My new Sp14 build Empty Re: My new Sp14 build

    Post by Laminarman Wed Jan 01, 2014 8:49 pm

    So where do you go trout fishing???
    avatar
    pigface


    Posts : 85
    Join date : 2011-04-10
    Location : pittsburgh

    My new Sp14 build Empty Re: My new Sp14 build

    Post by pigface Wed Jan 01, 2014 9:59 pm

    Michael , I bought the inlay banding on ebay . A while ago I was looking for some inlay for a couple small end tables I started making , and saw the wide banding I put in the front  and immediately thought it would be perfect for the front of a preamp case . It took me  a few months  to actually splurge for it !   This banding was made by a French company that went out of business in the 1930's !  And was kind of delicate .  You can see a picture of it in the first two photos . I should have just enough left for a PH16 Very Happy eventually  . Since I think this was the last piece like this he had .
    All you need is a good router ,  measure the width and depth of the size of your inlay , rout out a slot and glue the inlay in .  It was harder getting the corner mitres cut and fitted tightly .

     Kygeezer , My first SP14 is basicly  stock except for  the coupling caps .  But stills sounds awesome .

    Laminarman , I haven't done much trout fishing lately . My knees arn't what they used to be  Evil or Very Mad   But I've trout fished all over the country . Every mountain state out west except for Washington  Smile . My first serious foray into woodworking was building bamboo fly rods for ten years .

    Back on topic , What tubes are everybody using in their SP14 ???  The exposed tubes will make tube rolling easy . I got a deal on some 40's  Sylvania 6SN7W's   and don't know  what to try for the second pair .
    sKiZo
    sKiZo


    Posts : 1530
    Join date : 2013-04-01
    Location : Michigan USA

    My new Sp14 build Empty Re: My new Sp14 build

    Post by sKiZo Wed Jan 01, 2014 10:02 pm

    Looks like you used some kind of super long RCA jacks? I went with a wood back, but put a metal plate behind it ...

    My new Sp14 build Assembly-back

    Also ... transformer ... I assUme it's an Antek 5T240? Plenty reserve to run a phono stage also?
    avatar
    pigface


    Posts : 85
    Join date : 2011-04-10
    Location : pittsburgh

    My new Sp14 build Empty Re: My new Sp14 build

    Post by pigface Wed Jan 01, 2014 10:42 pm

    I did about just the opposite of you . I used standard rca's but routed a pocket in the back of the case  until the wood was only 1/4" thick . About the thickest it could be and still get the jam nut on . Basicly I did the same for all the  sockets , switches and attenuators . I left the top thick so I could mount screws - studs  to mount the circut board on . I wish I could have made it thinner so more of the tubes stick through . It covers most of the tube base .

    My new Sp14 build SP14cabinet18

    Yes an Antek AS-05T240 . But there is no room in the case for a phono section . That will have to be another complete build .
    sKiZo
    sKiZo


    Posts : 1530
    Join date : 2013-04-01
    Location : Michigan USA

    My new Sp14 build Empty Re: My new Sp14 build

    Post by sKiZo Wed Jan 01, 2014 10:52 pm

    Aha! ...

    As far as the tube reveal goes, socket savers might do the trick for ya ... I went with 28mm holes for the drivers in my top plate and they fit fine ...

    My new Sp14 build $_12

    $3 each on da bay ...

    If your chassis holes are big enough, might even be able to get away with adding octal adapters ... adds all sorts of possibilities ...

    My new Sp14 build $(KGrHqN,!p0FCy7gY++7BQ4,nZ3dN!~~60_12

    We were just talking about those the other day in another thread ...

    ~~~

    I was just wondering if the Antek AS-05T240 had enough juice to power both the pre and a phono section. Roy?? Here, Roy!
    avatar
    BNR_1


    Posts : 111
    Join date : 2013-06-11

    My new Sp14 build Empty Re: My new Sp14 build

    Post by BNR_1 Thu Jan 02, 2014 1:16 am

    SkiZo does that 9 pin socket saver come apart? I e-mailed a company that posted a very similar product but they never responded back. I am looking for a 9 pin base but cannot find any. All I see are the 9 pin pcb base.

    Thanks
    sKiZo
    sKiZo


    Posts : 1530
    Join date : 2013-04-01
    Location : Michigan USA

    My new Sp14 build Empty Re: My new Sp14 build

    Post by sKiZo Thu Jan 02, 2014 1:34 am

    Yup ... I got some and they work fine.

    My new Sp14 build $(KGrHqVHJBEE-b5pZ0LGBPpF1KhBcQ~~60_57

    9 pin tube amp/tester socket savers (can be unbolted)
    Zimmer64
    Zimmer64


    Posts : 123
    Join date : 2013-01-29
    Age : 60
    Location : Switzerland

    My new Sp14 build Empty Re: My new Sp14 build

    Post by Zimmer64 Thu Jan 02, 2014 4:10 am

    pigface wrote:Back on topic , What tubes are everybody using in their SP14 ???  The exposed tubes will make tube rolling easy . I got a deal on some 40's  Sylvania 6SN7W's   and don't know  what to try for the second pair .

    I use Sylvania's from the late 50's that I bought from Vintage Tube Services and could not be happier.

    Michael
    avatar
    BNR_1


    Posts : 111
    Join date : 2013-06-11

    My new Sp14 build Empty Re: My new Sp14 build

    Post by BNR_1 Thu Jan 02, 2014 7:09 pm

    Thanks sKiZo
    avatar
    ruffian


    Posts : 43
    Join date : 2010-02-26

    My new Sp14 build Empty Re: My new Sp14 build

    Post by ruffian Sat Jan 04, 2014 1:27 am

    I like the rear mount selector.  That was the way I made mine.  You end out with a lot less wire running through the amp with it back there.


    Last edited by ruffian on Sun Jan 05, 2014 11:00 pm; edited 1 time in total
    avatar
    pigface


    Posts : 85
    Join date : 2011-04-10
    Location : pittsburgh

    My new Sp14 build Empty Re: My new Sp14 build

    Post by pigface Sat Jan 04, 2014 10:15 pm

    Ruffian . You should  , I stole the idea from you .   Very Happy    I figure it should eliminate at least twenty feet of wire .

     I was thinking of using the Belton  sockets with the longer pins  to raise the tubes up  so they would be more exposed , but was worried the pins  would eventually twistn or bend  because of the length  so I decided against that . They will be good enough as is .  I don't want to use an adapter , that's just another connection to go loose  and make a bad connection .

    I got started on the board . It takes a bit of thinking , considering and figuring out where and how all the components will go since everything except the tube sockets will be on the bottom of the board . It looks almost backwards and upside down  in comparison to the layout diagram . You have to be careful and double and triple check  where and how you solder everything in . Then check again.  Caught one mistake luckily before soldering .


    I used Caddock MK series resistors  in most spots in the power supply where I could get the right size , and Elna electrolytic caps in some spots . Again where I could get the right size  .

    My new Sp14 build Board02

    My new Sp14 build Board01

    My new Sp14 build Board03


    I raised all components  off the board  about 1/8" to prevent anything from bridging a trace  that and to be able to see if i had good solder joints .

    My new Sp14 build Board04

    My new Sp14 build Board05

    My new Sp14 build Board06

    Special care needs to be taken to the heatsinks on the regulators because they contact the traces and would short out .  I also had to do a little modifications to them .

    My new Sp14 build Heatsink1

    First when you mount them to the bottom , the registering pins don't line up any more  so I had to drill new holes in the circut board to match .  

    My new Sp14 build Heatsink2

    My new Sp14 build Heatsink3

    Then raise and insulate them from the board . I just used little pieces of a circut board cut to fit .

    My new Sp14 build Heatsink4

    And after the caps  where mounted I found I had interference there too  and had to notch the  heatsinks for clearance . You need to double check the polarity on these as they look like they are mounted backwards when they are mounted on the bottom . ( upside down actually ). These heat sinks seem alot bigger than the ones on my other SP14.

    My new Sp14 build Heatsink7

    My new Sp14 build Heatsink6

    My new Sp14 build Heatsink8

    On the signal side I decided to use Jensen copper  ( mounted in the case ) some Jupiter coupling  capacitors , they both got some good write ups so I figure I would give them a try . The Jupitors were supposedly redesigned recently to accept more heat than the older ones did ,  about the same temp tolerances  as the mundorf S/O caps there is a post on . And with the tubes mounted on the outside and with all the airflow holes  heat shouldn't be a problem . I hope .  Smile 
    The resistors are a combination  of Vishay VAR  and Caddock TF  (when I get them ).  Then again  raising the components and checking for  contact to the traces since there is more exposed metal area on the signal side or-f the board .
    My new Sp14 build Board07

    My new Sp14 build Board08

    My new Sp14 build Board09

    My new Sp14 build Board10

    My new Sp14 build Board11

    My new Sp14 build Board12

    I started to put in some of the power wiring for the power switch LED and  Bent remote volume motor .

    My new Sp14 build Board13

    I'm at a stand still here now . The board is almost together . I accidently ordered  one size of the resisitors   Evil or Very Mad  and I am waiting for them . And also waiting for the Polyurethene to dry on the case . So it will be  a little time yet before finishing .
    arledgsc
    arledgsc


    Posts : 504
    Join date : 2012-11-30

    My new Sp14 build Empty Re: My new Sp14 build

    Post by arledgsc Sun Jan 05, 2014 1:27 pm

    Looking really good!!!   cheers
    Roy Mottram
    Roy Mottram
    Admin


    Posts : 1838
    Join date : 2008-11-30

    My new Sp14 build Empty Re: My new Sp14 build

    Post by Roy Mottram Sun Jan 05, 2014 4:31 pm

    smart thinking on the solution to the heat sinks on the bottom, BTW, those new ones are twice as big as the ones I used to supply
    avatar
    pigface


    Posts : 85
    Join date : 2011-04-10
    Location : pittsburgh

    My new Sp14 build Empty Re: My new Sp14 build

    Post by pigface Sun Jan 19, 2014 9:05 pm

    I'm still waiting on a half dozen resistors  but I did some wireing  on the seletor switch and attenuators  .  Remote mounting the selector really saves on the amount of wireing .

    My new Sp14 build SP14cabinet44

    My new Sp14 build SP14cabinet43

    My new Sp14 build SP14cabinet49

    My new Sp14 build SP14cabinet50

    My new Sp14 build SP14cabinet51

    Here are a couple of pictures of the Bent remote motor set up and small circut board .   One click on the remote moves the attenuator up or down  one  click . I didn't tryout  it in the cabinet yet just while setting up the motor on the attenuator and calibrating it , so I don't know how sensitive it is yet .

    My new Sp14 build SP14cabinet52

    My new Sp14 build SP14cabinet53


    The case is mainly done  maybe a little more polishing on it .

    My new Sp14 build SP14cabinet48

    My new Sp14 build SP14cabinet46

    My new Sp14 build SP14cabinet45


    Oh.  Shocked   And while checking these and my old  pictures comparing this circut board to my first SP14 build  when I didn't have anything to do , I noticed that I had soldered the TIP50's in wrong way around !  So it just goes to show  check and recheck  then check again.  Evil or Very Mad  . So I had to redo that mishap and then I went over EVERYTHING again . I'm lucky I caught it before  fireing it up .

    Hpoefully I can finish it up this next weekend .
    Roy Mottram
    Roy Mottram
    Admin


    Posts : 1838
    Join date : 2008-11-30

    My new Sp14 build Empty Re: My new Sp14 build

    Post by Roy Mottram Sun Jan 19, 2014 9:25 pm

    looks great !!
    avatar
    pigface


    Posts : 85
    Join date : 2011-04-10
    Location : pittsburgh

    My new Sp14 build Empty Re: My new Sp14 build

    Post by pigface Sat Feb 01, 2014 9:53 pm

    I finally recieved  the last  resistors I was waiting on , finished my soldering bolted the Transformers in and quintuple checked everyting over .
    My Amp in ths system has XLR inputs only ( No tubes yet )  so I'm still waiting on  RCA to XLR converter. And the RCA to XLR adapter plugs I bought didn't work too well .  The Amp dosen't like them at all !  Buzz , Loud Hum , shuts itself off !
     
    So here are a few more pictures  before I plug everything in .


    I was at least able to confirm the Bent Tap remote control volume  works  nice , from all the way across the room.

    My new Sp14 build SP14cabinet54

    My new Sp14 build SP14cabinet55

    My new Sp14 build SP14cabinet56

    My new Sp14 build SP14cabinet57

    My new Sp14 build SP14cabinet58


    I hope to be able to listen to this Monday or Tuesday if the balanced to unbalanced converter works  as it's advertised . I also have to pick up a couple cheap temporary RCA interconnects until I can convert my good cables over , I forgot about them too.  Shocked
    sKiZo
    sKiZo


    Posts : 1530
    Join date : 2013-04-01
    Location : Michigan USA

    My new Sp14 build Empty Re: My new Sp14 build

    Post by sKiZo Sat Feb 01, 2014 10:58 pm

    Getting close ... no sense rushing now.

    The XLR thing ... does your amp have a switch to "lift the leg" as they say? You need to lift the secondary ground on some connections for them to work properly.

    My new Sp14 build Fig4BartlettHumRFI

    Can't depend on an adapter to do it right either.
    avatar
    pigface


    Posts : 85
    Join date : 2011-04-10
    Location : pittsburgh

    My new Sp14 build Empty Re: My new Sp14 build

    Post by pigface Sun Feb 02, 2014 3:35 pm

    The amp does not have a user  selectable  way of switching to RCA . The manufacturer did sell an adapter plug but since the amp is about 10 years old and they do not sell this model any more  I didn't look into it . That and it would probobly cost an arm and leg like everything else they sell.

    If an adapter is internally wired correctly it would  work . I didn't want to modify my good interconnects until I made sure everything works , especially if it wasn't going to be right.

    But there are  a couple different wiring configurations  to convert  RCA's to XLR ,  your diagram and another is to wire #2 and #3 together for ground and #2 for the signal .  I guess the adapter plug I bought was the wrong config for my amp .

    Anyway my balanced to unbalanced converter will be here tomorrow , so we will see  .   If that dosen't  work I'll bring my ST-120 down and hook it up through that to see how the new SP14 sounds . Its a bit underpowered for my speakers but it will work temporarally until I get The amp situation figured out .

    One of my NOS tubes is a bit crackally sounding for a couple seconds  ( if thats a word  Shocked ) on powerup and down . I did notice that for the short time I had the SP14 powered up .
    avatar
    pigface


    Posts : 85
    Join date : 2011-04-10
    Location : pittsburgh

    My new Sp14 build Empty Re: My new Sp14 build

    Post by pigface Tue Feb 04, 2014 9:00 pm

    Ok , I recieved the balanced to unbalanced converter yesterday . It got rid of the shutting down of the amp problem and reduced the humming by half but dosen't sound "right . Almost like mono .  So  I'm having doubts I'll be able to use the SP14 with this amp . But I put a few albums on to see how it sounds . First some Bob Marley . The bass in the first couple tracks  sounded really good  but the vocals sounded flat , dead sounding .  Some Macartney  next  was just the opposite nice sounding vocals  but no low end  .  So the converter only helped a little and not  a remedy. Still annoying hum . And what I thought was a tube making noise was this also not a bad tube .
     So tonight I brought the ST120 down  and plugged it in  just as I thought  a little underpowered . My speakers reccomend 60-250 watts . But the Sp14 sounds much better now .  Dead quiet no hum at all .  I guess the hum was coming from the rca - xlr mismatch .  Over all it is much nicer sounding now but the bass is down because of the lack of power .  I don't have much time to listen to it  tonight . I might drag out my old Carver 1.0t and see how it sounds with that amp . Eventually I would like to bild the M125's for this  .  Very Happy
    avatar
    pigface


    Posts : 85
    Join date : 2011-04-10
    Location : pittsburgh

    My new Sp14 build Empty Re: My new Sp14 build

    Post by pigface Mon Feb 10, 2014 10:05 pm

    I've finally  got the RCA-XLR , balanced to unbalanced problem worked out and the last little bit of hum gone also . It seemed some of the hum was a ground loop  and putting  two prong to three prong "cheater" plugs on all the components , mainly the amp , got rid of 99% of all hum noise.  
    There is one last minor noise problem which may or may not be easily fixable . I think it is from the wood case being so rigid  and that I didn't  use any sound deadining material inside the case , since I figured the wood would  act  as a sound deadiner . When you tap on the case with it powered on you can hear a slight thump sound through the speakers , not a ringing microphonic sound  but a solid sound .  I'm guessing the vibrations are being transmitted through the case to the board and being slightly amplified by the tubes , because the case is so rigid ?  I put dampners on the tubes and that helped some and also on the hard rubber feet I bought for the case , I put little round disks like you put on bottom of  a vase to keep it from scratching , I used  one of carpet material and one of rubber material on each foot  and that helped out alot .  If I were to do this again I would mount the board a little differently maybe rubber isolators on both sides of the board and under the stand offs ? The noise is not totally  gone but acceptable and about all I can do with it at the moment . I don't think I'll ever play this loud enough for  noise vibration to be a problem to transmit any noise to the speakers .

    Now the important part , How does it sound ?  Awesome .  I've played a bunch of different music so far , Rock , hard , soft , Psychedelic . Blues, Reggae , Classical even some Country  . Moody Blues days of future past , SRV , Rush , Doors , Floyd ,Willie Nelson Merle Haggard , Spirit , Van Morrison , Elvis Costello , Roy Buchanan, Beach Boys , Ect Ect .
       I'm listening through the Jensen  coupling caps now and have about 25-30 hours on it so far and it sounds like it has smoothed out already . The highs were a "little" harsh , buzzy sounding  at first .  The soundstage is not much wider than with the SS preamp  but is deeper and all the way across the room   .  The bass , the drums are tight and not muddy at all , bass guitar is smooth and not buzzy sounding . The vocals are very nice and accurate sounding . The highs now that they have smoothed out some  are already better sounding without the slight brightness  and little "essy-hissy" sound they had .
    I think I'm finally hearing what "That Tube Sound " really means . The music overall has a smoother less hard edged sound than before  , almost a little ambience to it .  I'm really liking this so far !  The piano sounds like its in the room , and  Stevie Ray's guitar on Tin pan ally  Shocked . Once it breaks in it can only get better right .

    The NOS tubes I'm useing now  are  a pair of mid 1940's Sylvania JAN-CHS-6SN7W  , A pair of 1957 JAN-CHY-5692 CBS Hytron , And  a 1944 Sylvania JAN-CHS-6X5GT/G rectifier .  The CBS Hytron tubes ( which are supposed to be the same as the RCA red base 5692's ?) are chunks , they are heavy  and look well made . I can see why they say these are 10,000 hour tubes ! I also got a pair of good used JAN-CRC-6SN7GT  VT-231 RCA's and Sylvania 5692's to try out later.
    Like I said I'm running the Jensen caps right now  , I'll try out the Jupiters  and see how they sound once these break in a while .

    A couple last pics .

    My new Sp14 build Tubes2

    My new Sp14 build SP14cabinet60

    You can see the audiophile grade foot dampeners in this picture.  Very Happy  They helped alot .
    I like how the white of the dampners look too .
    My new Sp14 build SP14cabinet61

    And the whole system.

    My new Sp14 build SP14cabinet62

    My new Sp14 build System
    Cubdriver
    Cubdriver


    Posts : 83
    Join date : 2014-01-21
    Age : 59
    Location : Southeastern Litchfield Co, CT

    My new Sp14 build Empty Re: My new Sp14 build

    Post by Cubdriver Mon Feb 10, 2014 11:55 pm

    Very nice! Installing the input selector near the back panel is an excellent idea - it keeps the low level signal lines short and (hopefully) away from other wiring that might induce hum or other nastiness on them.

    Really sharp looking build - that cabinet looks amazing!

    -Pat

    Sponsored content


    My new Sp14 build Empty Re: My new Sp14 build

    Post by Sponsored content


      Current date/time is Mon Nov 25, 2024 12:24 pm