


I just completed my amp upgrade per this post and wanted to share my notes and documentation.
First off, a note to Dan Willoughby who took the time to work through the issues and is as always making improvements in documentation and design.
As I was already repairing the amp, (due to ground lug coming loose as I put tubes in /out it came loose and blew out the transistor), I figured I would take the time to some upgrades
1) Purchase Dual Rectifier board and upgrade. Which I understand helps with more continual / heavy use of the amp.. aligning with how I use it.
2) Purchase bias Display, so I am more conscious about bias drift to indicate tubes wearing out.
3) Purchase bias "port" upgrade. This one I did as to put in the bias drift display units then would require pulling tubes "up" to be able to contact pins on tube with Digital multimeter (displays are a guide) and that to me is not convenient.
4) One other design consideration was to NOT abandon the Triode/pentode switching connection Which per above posting.. I used his great idea of just moving them to between main tubes.
Note: My upgrade path required drilling the steel case multiple times. My means to protect items and not damage things. Hot glue small chunk of wood on backside of location. This is backing for when you "punch though", also directs metal filings out, vs inside. Also on outside you can use painters tape to create "file catch" and so keep metal bits from getting around where they should not be.
Dual Rectifier upgrade:
Documentation was helpful but with help of Dan, I built a table of "before" and after, to account for every wire I disconnected from old design, to new DR upgrade.
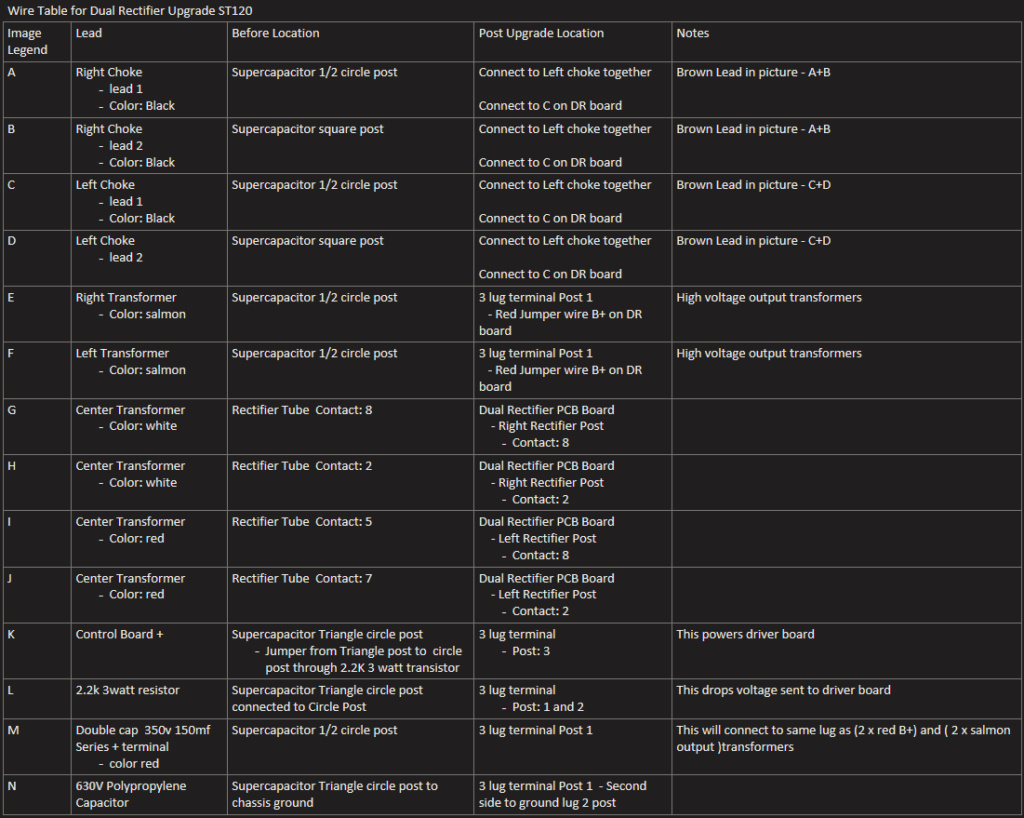
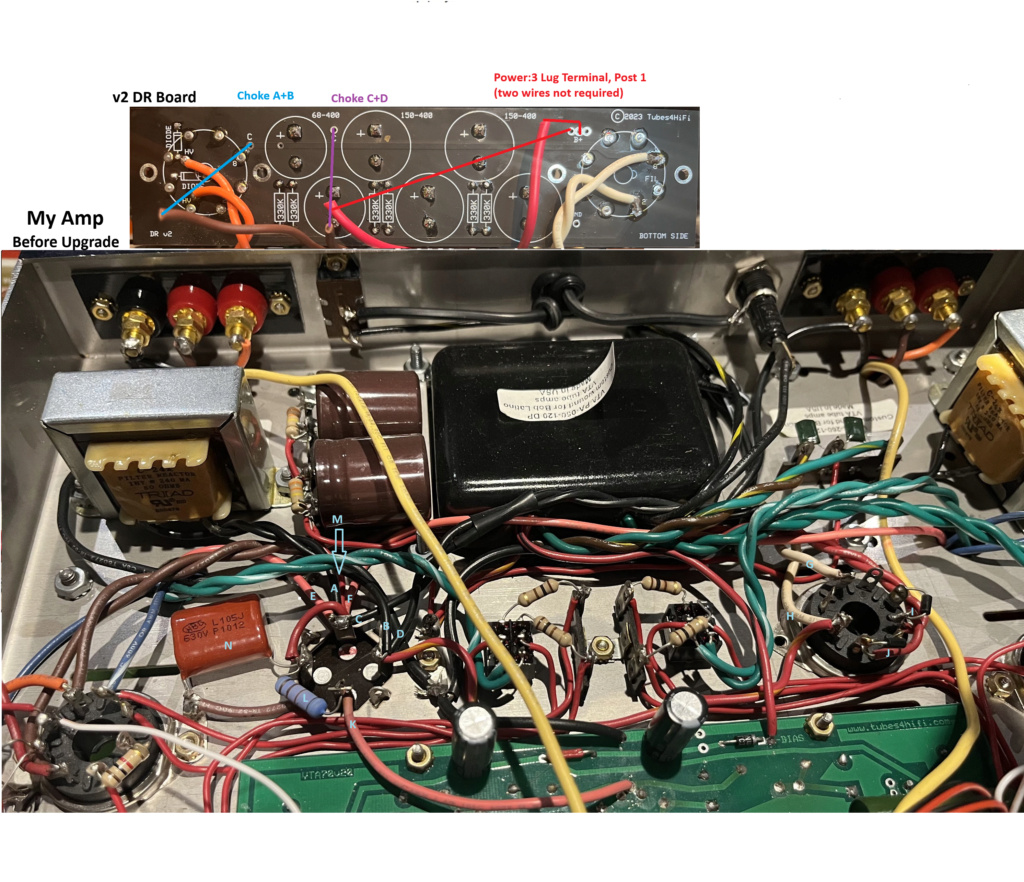
Diagram of "before" against above table also showing new Dual Rectifier upgrade version 2 of board. Sorry for not taking a "finished picture" but missed that
Notes:
- I was following diagram for DR upgrade PCB board version 1 which needed two "red B+ contacts, but new board design does not require this as it has common contact point.
- I also used shorter stand-offs I had from motherboards. they were 1/8" shorter than ones provided. I was trying to give better stability to board and lower deflection from insert of rectifier tubes, but meh.. it looks nicer but in end was not worth the calories.
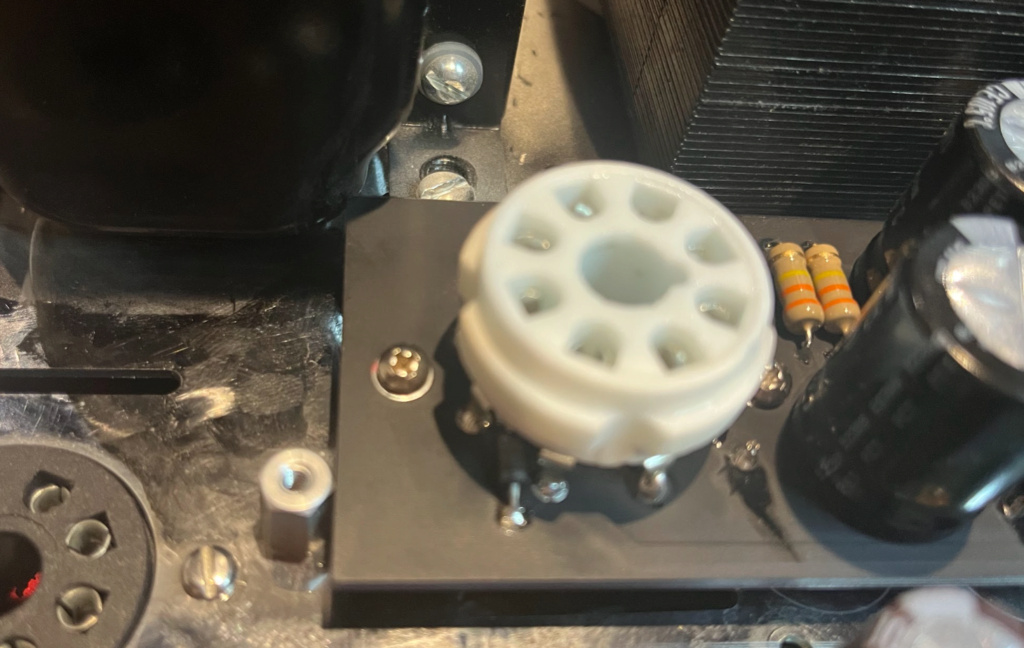
- I did take time to drill out the fourth hole needed to mount all four standoffs. The right most hole is where the supercap use to be and so does not have a hole already (two from old rectifier tube and third from center ground lug screw lined up just fine). To get that last / fourth one.. use magic marker with other three in place and mark , drill out..
Update: I forgot to post one other important tidbit... The new v2 Dual Rectifier board with my ST120 would not "fit" where holes of mounting posts lined up with holes on PCB board due to interference with the two side transformers. I "pushed" them back on their posts as far as possible but they still would not allow it to "fit" so I had to use a dremel and cut 1/4" corners off the PCB board to get around the "hips" of the two transformers. There are no traces in board to be concerned about. But this also why I used shorter "standoffs" to try to squeeze them under humps.. but in end had to clip corners.
Update 2: The root cause of all this process was noted as ground lug (nut with star washer) came loose as I pulled / changed tubes). As such I put a dab of hot glue on each ground lug scew. I know with star washer it should "bite" and hold and maybe it was over caution on my part tightening it.. but this gives me peace of mind that this will not happen again.
(((Forum has image qty limit so I will post in second part the bias upgrade)))
First off, a note to Dan Willoughby who took the time to work through the issues and is as always making improvements in documentation and design.
As I was already repairing the amp, (due to ground lug coming loose as I put tubes in /out it came loose and blew out the transistor), I figured I would take the time to some upgrades
1) Purchase Dual Rectifier board and upgrade. Which I understand helps with more continual / heavy use of the amp.. aligning with how I use it.
2) Purchase bias Display, so I am more conscious about bias drift to indicate tubes wearing out.
3) Purchase bias "port" upgrade. This one I did as to put in the bias drift display units then would require pulling tubes "up" to be able to contact pins on tube with Digital multimeter (displays are a guide) and that to me is not convenient.
4) One other design consideration was to NOT abandon the Triode/pentode switching connection Which per above posting.. I used his great idea of just moving them to between main tubes.
Note: My upgrade path required drilling the steel case multiple times. My means to protect items and not damage things. Hot glue small chunk of wood on backside of location. This is backing for when you "punch though", also directs metal filings out, vs inside. Also on outside you can use painters tape to create "file catch" and so keep metal bits from getting around where they should not be.
Dual Rectifier upgrade:
Documentation was helpful but with help of Dan, I built a table of "before" and after, to account for every wire I disconnected from old design, to new DR upgrade.
Diagram of "before" against above table also showing new Dual Rectifier upgrade version 2 of board. Sorry for not taking a "finished picture" but missed that
Notes:
- I was following diagram for DR upgrade PCB board version 1 which needed two "red B+ contacts, but new board design does not require this as it has common contact point.
- I also used shorter stand-offs I had from motherboards. they were 1/8" shorter than ones provided. I was trying to give better stability to board and lower deflection from insert of rectifier tubes, but meh.. it looks nicer but in end was not worth the calories.
- I did take time to drill out the fourth hole needed to mount all four standoffs. The right most hole is where the supercap use to be and so does not have a hole already (two from old rectifier tube and third from center ground lug screw lined up just fine). To get that last / fourth one.. use magic marker with other three in place and mark , drill out..
Update: I forgot to post one other important tidbit... The new v2 Dual Rectifier board with my ST120 would not "fit" where holes of mounting posts lined up with holes on PCB board due to interference with the two side transformers. I "pushed" them back on their posts as far as possible but they still would not allow it to "fit" so I had to use a dremel and cut 1/4" corners off the PCB board to get around the "hips" of the two transformers. There are no traces in board to be concerned about. But this also why I used shorter "standoffs" to try to squeeze them under humps.. but in end had to clip corners.
Update 2: The root cause of all this process was noted as ground lug (nut with star washer) came loose as I pulled / changed tubes). As such I put a dab of hot glue on each ground lug scew. I know with star washer it should "bite" and hold and maybe it was over caution on my part tightening it.. but this gives me peace of mind that this will not happen again.
(((Forum has image qty limit so I will post in second part the bias upgrade)))
Last edited by penguinpages on Tue Sep 12, 2023 9:40 am; edited 2 times in total


