The Dynaco Tube Audio Forum

Would you like to react to this message? Create an account in a few clicks or log in to continue.
The Dynaco Tube Audio Forum

Dedicated to the restoration and preservation of all original Dynaco tube audio equipment - Customer support for Tubes4hifi VTA tube amp and preamp kits and all Dynakitparts.com products


+2
Bob Latino
arledgsc
6 posters

    ST-120 Kit Finished

    arledgsc
    arledgsc


    Posts : 496
    Join date : 2012-11-30
    Age : 70
    Location : Santa Rosa CA

    ST-120 Kit Finished Empty ST-120 Kit Finished

    Post by arledgsc Sun Dec 16, 2012 12:12 pm

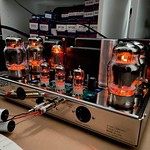
    Finished ST-120 wiring yesterday. This is a great kit and enjoyed building it.  The chassis is something special.  I added an IEC connector and it took two saw blades and a couple of drill bits to get it done.  This is one tough chassis.  

    The ST-120 sounds great.  There is no comparison to the AV receiver I have been using even with only a few hours of run in.  Good sense of rhythm and pace, reduced harshness, and extremely low background noise.  All is good!  

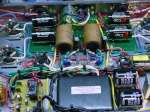
    I also made a few layout changes to the triode/ ultralinear switches to save wire. I wanted twisted pairs of the plate and screen wires off the switches/ terminal blocks to match the ouput transformer colors.  So I saved the green and blue striped wire cuttings from the transformers to route back to the V2 and V7.  They were just barely long enough to make the run.  The regular green and blue wire transformer cuttings weren't long enough but I had a few spare feet of those colors.  This change sure made verification of wiring very simple.

    There are also some other wire color changes that attempted to match the pictoral drawing where possible.  Also used some shielded cable off the stepped attentuator.  And a special nod to Tech Spray solder flux remover. It does the job well but you have to spend some time with cotton swaps to remove the last trace. But it gets it all and leaves you with a clean, professional looking board.  

    I appreciate Bob's attention to detail and his help. This is a great kit and parts are top notch.  Regards, Scott

    ST-120 Kit Finished DSC00671_zpsa43c8e34


    Edit: Latest mods  Caps, Attenuator
    ST-120 Kit Finished ST-120_Recap2_zps753b5f0b


    Last edited by arledgsc on Sun Sep 01, 2013 11:31 am; edited 1 time in total
    Bob Latino
    Bob Latino
    Admin


    Posts : 3263
    Join date : 2008-11-26
    Location : Massachusetts

    ST-120 Kit Finished Empty Re: ST-120 Kit Finished

    Post by Bob Latino Mon Dec 17, 2012 12:59 pm

    Hi Scott - Your wiring in the photo is top notch .... very neat. You can tell a lot of care went in to putting your amp together. Yes - If you modify the chassis in any way, the 16 gauge stainless steel is very tough material. I hand tap the the four 6-32 bottom cover screw holes that the stainless 6-32 screws go in. The taps wear out very quickly.

    Glad to hear that you enjoyed building your kit ..

    Bob
    arledgsc
    arledgsc


    Posts : 496
    Join date : 2012-11-30
    Age : 70
    Location : Santa Rosa CA

    ST-120 Kit Finished Empty Re: ST-120 Kit Finished

    Post by arledgsc Tue Dec 18, 2012 11:27 am

    Thank you Bob. Great kit and sounding better everyday. I do have a small problem in that the stepped attenuator is wired backward. (operator error). Big jump in volume on first step and small steps as the knob is maxed. So need that corrected.

    Just remarkable how quiet this amp is and I do have the chassis grounded through the IEC connector (potential ground loop). When the TDR kicks in I hear nothing from the speakers until the music starts to play. Thank you again, Scott
    avatar
    Bally


    Posts : 25
    Join date : 2010-05-18

    ST-120 Kit Finished Empty Re: ST-120 Kit Finished

    Post by Bally Tue Dec 18, 2012 4:37 pm

    arledgsc

    Solder flux can be easily removed with a combination of isopropyl alcohol and hydrogen peroxide.

    Mix equal parts and use cotton for cleaning. And don't forget to use gloves.
    arledgsc
    arledgsc


    Posts : 496
    Join date : 2012-11-30
    Age : 70
    Location : Santa Rosa CA

    ST-120 Kit Finished Empty Re: ST-120 Kit Finished

    Post by arledgsc Thu Dec 20, 2012 11:41 am

    Solder flux can be easily removed with a combination of isopropyl alcohol and hydrogen peroxide.
    Thanks for that tip. Tech Spray is quite volatile and ventilation is mandatory. Also fairly costly.
    avatar
    Sprags


    Posts : 123
    Join date : 2013-02-27

    ST-120 Kit Finished Empty Re: ST-120 Kit Finished

    Post by Sprags Sun Apr 07, 2013 5:37 pm

    In the world of metal working cutting oil helps when drilling and tapping. You really don't need any special oil unless you are machining exotic and tough materials such as titanium or Inconel, though stainless can be tough too. A few drops of regular motor oil works wonders. WD40 or 3-in-1 will work too but they are actually a little on the thin side. Standard 10W-30 or 10W-40 will work fine. No need for synthetics either though if that's all you have it will be better than nothing.
    corndog71
    corndog71


    Posts : 840
    Join date : 2013-03-19
    Location : It can get windy here

    ST-120 Kit Finished Empty Re: ST-120 Kit Finished

    Post by corndog71 Thu Sep 26, 2013 11:42 am

    Scott, as a fan of cap rolling I have to ask: How is your amp with those V-Caps compared to the Russian caps? I'd love to get a set of those CuTF caps but that would cost nearly as much as the amp itself!
    hawaii.ken
    hawaii.ken


    Posts : 157
    Join date : 2012-01-31

    ST-120 Kit Finished Empty Re: ST-120 Kit Finished

    Post by hawaii.ken Thu Sep 26, 2013 3:15 pm

    Bob Latino wrote:I hand tap the the four 6-32 bottom cover screw holes that the stainless 6-32 screws go in. The taps wear out very quickly.
    Bob
    What kind of cutting oil do you use? I recommend Ridgid 74012 Extreme Performance Stainless Steel Thread Cutting Oil:
    http://www.toolup.com/ridgid_74012_extreme-performance-stainless-steel-thread-cutting-oil-1-gallon.aspx

    Also look into getting a solid tungsten carbide tap, they're expensive but worth the extra $$:
    NEW # 6-32 SOLID CARBIDE TAP 2 FLUTE

    arledgsc
    arledgsc


    Posts : 496
    Join date : 2012-11-30
    Age : 70
    Location : Santa Rosa CA

    ST-120 Kit Finished Empty Re: ST-120 Kit Finished

    Post by arledgsc Thu Sep 26, 2013 4:27 pm

    "Scott, as a fan of cap rolling I have to ask: How is your amp with those V-Caps compared to the Russian caps? I'd love to get a set of those CuTF caps but that would cost nearly as much as the amp itself"
    I have no regrets but yes the cap changes cost about as much as the entire amp kit.  I recapped in June 2013 and the CUTFs supposedly take upwards of 400-500 hrs to settle in.  At the same time as the cap change I rolled in some Psvane KT-88s and 12AU7s which also have a notoriously long break-in cycle.  I thought if I am to wait several months I may as well kill two birds with one stone.  Sounded dreadfully thin with strange harmonics initially but after about a month sounded a lot better.  So I now have about 300 hrs on the package and I don't even remember what the PIOs caps sounded like LOL.  But it seems the CUTFs are not really a holy grail change but rather give better refinement and I say that as the silibance seems in better control.  The tubes, of course, play a roll in the amp's voice as well but the amp does sound great with a ton of controlled bass, silky highs, and nice vocal mid-range.  The harmonic detail is warm with excellent resolution and WIDE soundstage.  I really do enjoy the ST-120 (a lot) but the changes are taking the slow train to sonic nirvana but feel I am well over the hump at this point.... Scott

    Edit - In the past two weeks I've made some changes to source input to the DAC and its output fed straight into the amp's the Gold Point attenuator.  This has reduced the last bit of excessive sibilance and glare.  And have done some critical listening which I really haven't done in the past several months.  Have to say the amp sounds great!  I am wanting for nothing but still can't remember what the original caps sounded like.

    Sponsored content


    ST-120 Kit Finished Empty Re: ST-120 Kit Finished

    Post by Sponsored content


      Current date/time is Fri Apr 26, 2024 11:23 pm