The Dynaco Tube Audio Forum

Would you like to react to this message? Create an account in a few clicks or log in to continue.
The Dynaco Tube Audio Forum

Dedicated to the restoration and preservation of all original Dynaco tube audio equipment - Customer support for Tubes4hifi VTA tube amp and preamp kits and all Dynakitparts.com products


3 posters

    Upgrade of my 1960s Dynakit Mark IIIs with the VTA Driver Board

    SoundBound
    SoundBound


    Posts : 13
    Join date : 2011-07-31

    Upgrade of my 1960s Dynakit Mark IIIs with the VTA Driver Board Empty Upgrade of my 1960s Dynakit Mark IIIs with the VTA Driver Board

    Post by SoundBound Thu Aug 04, 2011 8:44 pm

    Just spent the last week building the VTA driver boards and carefully installing them in my vintage Mark IIIs.
    Installation went pretty smoothly, I did take my time to try and do a neat job. The Dynakit were built way back when by someone with a bit of a heavy soldering hand, so I took the chance to clean up some of the messier connections.

    Fired the puppies up today and they sounded sweet. Immediate improvement in bass and bigger, wider, airier scene too. Although it is early yet, need a 100 or so hours of burn in before they really can be evaluated. I purchased the bare boards and then picked my own components. Went with the low gain 12AU7 12BH7 configuration.

    For those of you like me who like to see pics, here are a couple.

    Let the good times roll.... (The Cars)
    SoundBound


    Upgrade of my 1960s Dynakit Mark IIIs with the VTA Driver Board DSCN5500Small
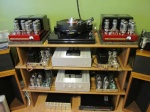
    Original Condition of the Mark IIIs when I got the amps.

    Upgrade of my 1960s Dynakit Mark IIIs with the VTA Driver Board DSCN5570Small
    My build of the VTA Boards.

    Upgrade of my 1960s Dynakit Mark IIIs with the VTA Driver Board DSCN5578Small
    Inside the belly of the beast !

    Upgrade of my 1960s Dynakit Mark IIIs with the VTA Driver Board DSCN5621Small
    Ready for tubes... and music.


    wedg714
    wedg714


    Posts : 74
    Join date : 2011-11-23

    Upgrade of my 1960s Dynakit Mark IIIs with the VTA Driver Board Empty Re: Upgrade of my 1960s Dynakit Mark IIIs with the VTA Driver Board

    Post by wedg714 Sat Nov 26, 2011 11:26 am

    hello. did you upgrade the quad cap to the 80/40/30/20 if so, did you use the original orientation that dynaco used or the orientation that dynakits supplies with the cap?
    avatar
    stewdan


    Posts : 231
    Join date : 2010-03-07
    Age : 85
    Location : Houston Texas

    Upgrade of my 1960s Dynakit Mark IIIs with the VTA Driver Board Empty MK3/VTA Plus Dynakitparts 80/40/30/20 Quad Cap

    Post by stewdan Tue Dec 06, 2011 12:47 am

    Hi Wedg714 --

    I see that you asked the same question that I did.

    Go back to the Forum Basket, and take a look at my Post "Mark 3 VTA with Dynakitparts 80/40/30/20 Quad Cap".

    Roy responded and said my Quad Cap Setup that I outlined in the question is correct.

    Stew

    avatar
    Guest
    Guest


    Upgrade of my 1960s Dynakit Mark IIIs with the VTA Driver Board Empty Re: Upgrade of my 1960s Dynakit Mark IIIs with the VTA Driver Board

    Post by Guest Sun Jan 08, 2012 8:53 pm

    Incredibly nice job of rebuilding your amps, very neat and clean work. I am curious about the chassis, did you clean up the old chassis and clear coat them, or are they new. The difference from the first pic to the last is a pretty astonishing jump. What type of Mundorf cap did you use? Finally, at the risk of asking a stupid question, how did you get the photo's in the body of the post? Thanks!
    SoundBound
    SoundBound


    Posts : 13
    Join date : 2011-07-31

    Upgrade of my 1960s Dynakit Mark IIIs with the VTA Driver Board Empty Re: Upgrade of my 1960s Dynakit Mark IIIs with the VTA Driver Board

    Post by SoundBound Sun Jan 08, 2012 11:24 pm

    Hi Michael;
    Thanks. It is the original chassis that I cleaned up first using isopropyl alcohol (99% pure) then followed up with metal polish (not sure which, brasso or something similar, be sure to check the label and ensure that it is ok with chromed surfaces!) and elbow grease. Most hardware stores will carry different brands and types of liquid metal polish. Just one comment when using the metal polishes, do not leave them on too long, work in small areas, apply the polish then wipe clean with dry cloth then a wet cloth to remove residue. I found that if you leave the polish on too long in one area it tends to 'stain' the chrome. No clear coat, just took the time to clean and hand polish/buff them.

    On these amps I have used the Mundorf M-Cap ZN. These are the relatively newer solid-tin caps from Mundorf. They have a nice neutral, detailed, clean sound and are not that expensive (compared to their silver/oil etc. which I have used on other projects and sound wonderful but are expensive) I think the price/performance level of the ZN caps is very good.

    To get the photos in the body of the post I had to host my photos on another site and then paste in the URL of the photo from that site in the posting with the "insert image" feature. My internet provider gives every customer web page space, so I put the photos there and link to them. There are various sites that can host pictures on the web that you can use and link to.

    Hope that helps.

    Sponsored content


    Upgrade of my 1960s Dynakit Mark IIIs with the VTA Driver Board Empty Re: Upgrade of my 1960s Dynakit Mark IIIs with the VTA Driver Board

    Post by Sponsored content


      Current date/time is Mon Mar 18, 2024 11:13 pm