The Dynaco Tube Audio Forum

Would you like to react to this message? Create an account in a few clicks or log in to continue.
The Dynaco Tube Audio Forum

Dedicated to the restoration and preservation of all original Dynaco tube audio equipment - Customer support for Tubes4hifi VTA tube amp and preamp kits and all Dynakitparts.com products


+2
WntrMute2
pigface
6 posters

    VTA PH15 build

    avatar
    pigface


    Posts : 85
    Join date : 2011-04-10
    Location : pittsburgh

    VTA PH15  build  Empty VTA PH15 build

    Post by pigface Thu May 03, 2012 9:48 pm

    Here are some pictures of my PH15 build . It was much needed since just building the SP14 preamp and not having a phono section in it left me not being able to listen to my albums .

    For some reason this build gave me some problems figuring everything out what went where and so on . The Sp14 went much easier for me . Probably because there were less instructions that went with this kit , I guess it was ment for people with more experience than me. Newbee mistakes mostly , luckily nothing major.
    Roy jinxed me by saying if I could do the SP14 the PH15 would be easy . Very Happy Even with no attenuators and the less wiring it went harder for me for some odd reason . But it turned out nice in the end , I think .

    I went with the Sonicap and Caddock resistor upgrades . And added a few other upgraded resistors I could get also . You get quality parts and board all around with this kit . I also went with the larger 16" wide chassis in black for more seporation of the now two boards . And also the option of external switching of MM and MC cartridges and low and high gain switches . Since I will be probobly sooner or later be upgradeing my cartridge . And also 2 outlets since I hope to plug it into my computers sound card too and copy some of my vinyl to my computer , Like on my other system .


    First I decided to seperate the power supply section from the signal section of the board , like Roy's PH14 , to hopefully lessen any chance of noise transfer , I don't know if this helped or if it was just the design of the unit but its dead quiet . My band saw made quick work of it though .

    VTA PH15  build  IMG_4400

    VTA PH15  build  IMG_4401

    VTA PH15  build  IMG_4402

    VTA PH15  build  IMG_4403


    VTA PH15  build  IMG_4404

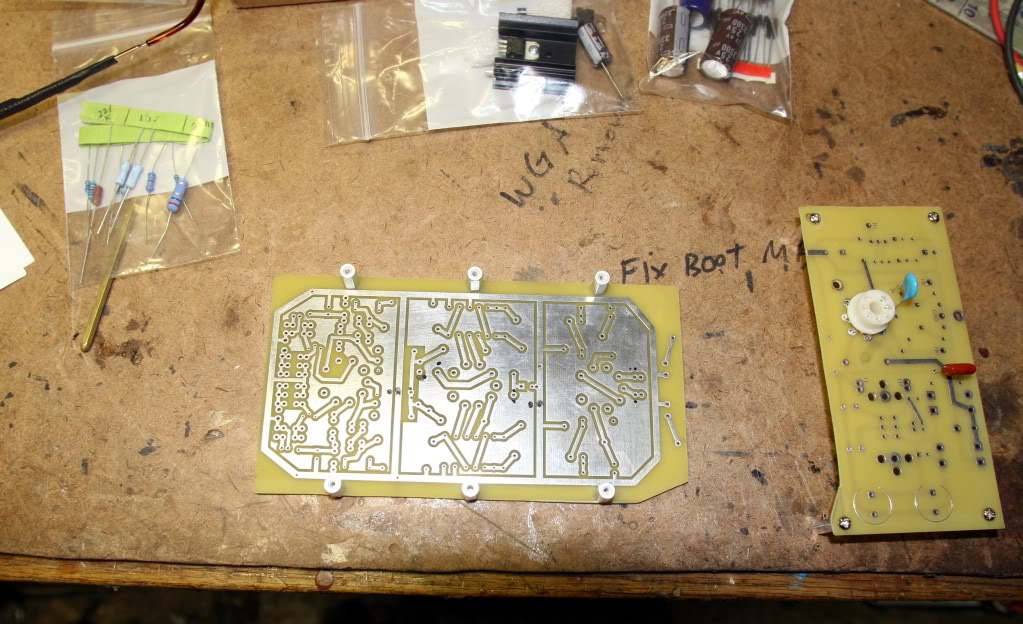
    Here is the finished power supply board . Left as it came no upgrades here . With 1950's NOS RCA 12x4 rectifier
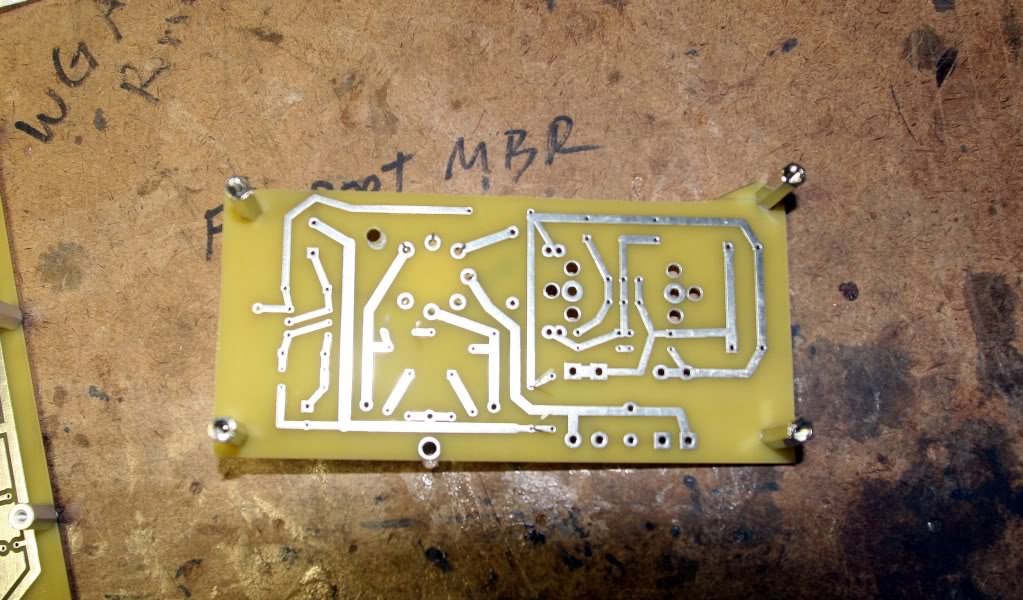
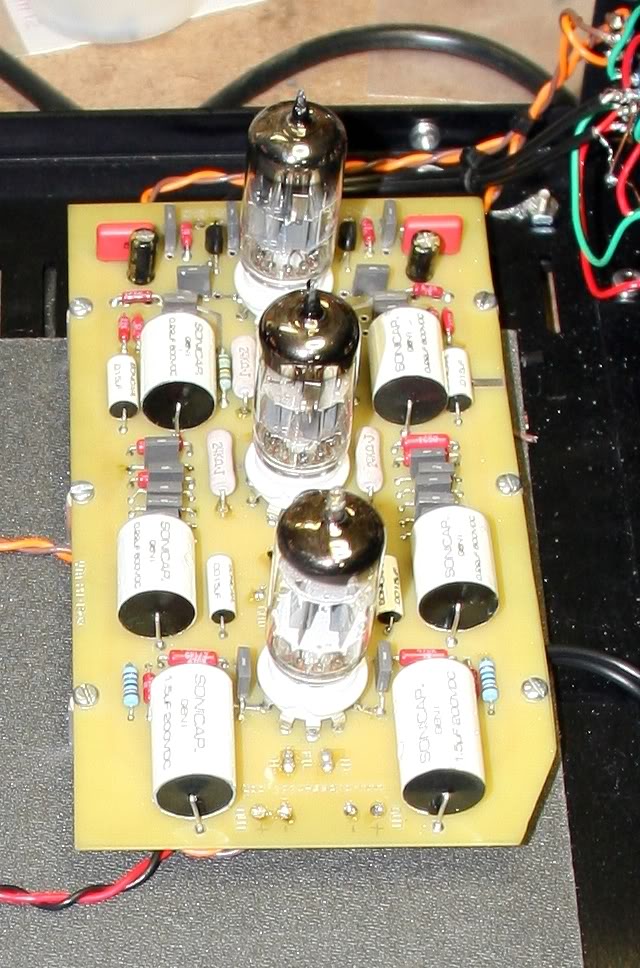
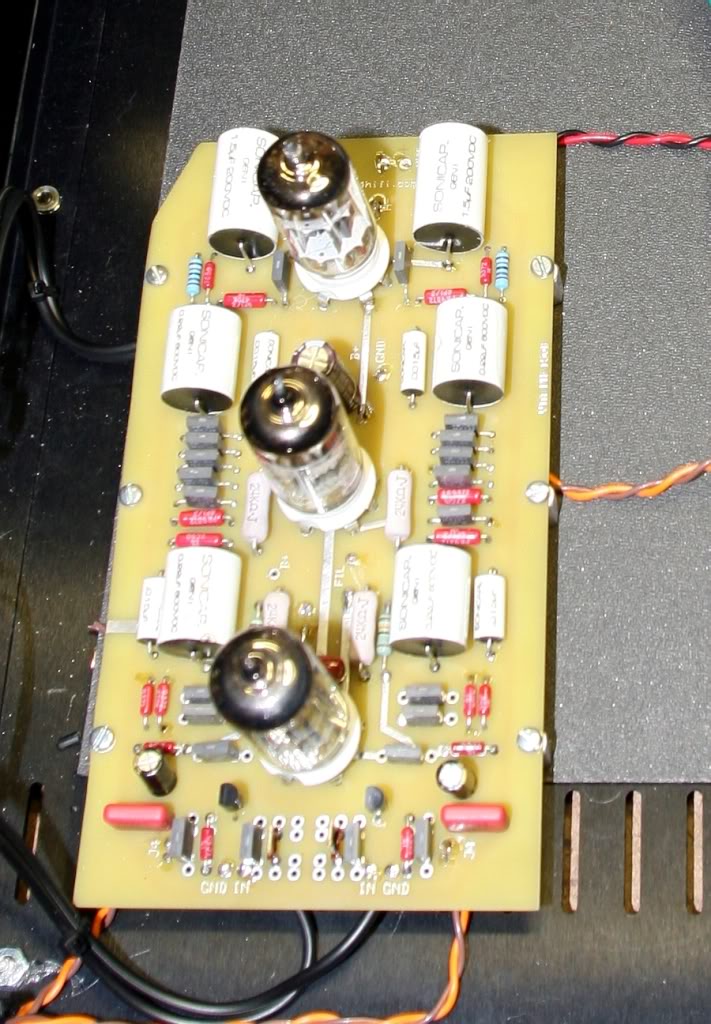
    VTA PH15  build  IMG_4408

    VTA PH15  build  IMG_4409

    VTA PH15  build  IMG_4410

    The signal side .

    VTA PH15  build  IMG_4411

    VTA PH15  build  IMG_4414

    Two NOS Ediswan CV2492's and one Mullard CV4003 that were recomended to me here . I also bought some NOS Siemens tubes to try out later also . Two and one .

    VTA PH15  build  IMG_4432S

    VTA PH15  build  IMG_4431S

    VTA PH15  build  IMG_4423S

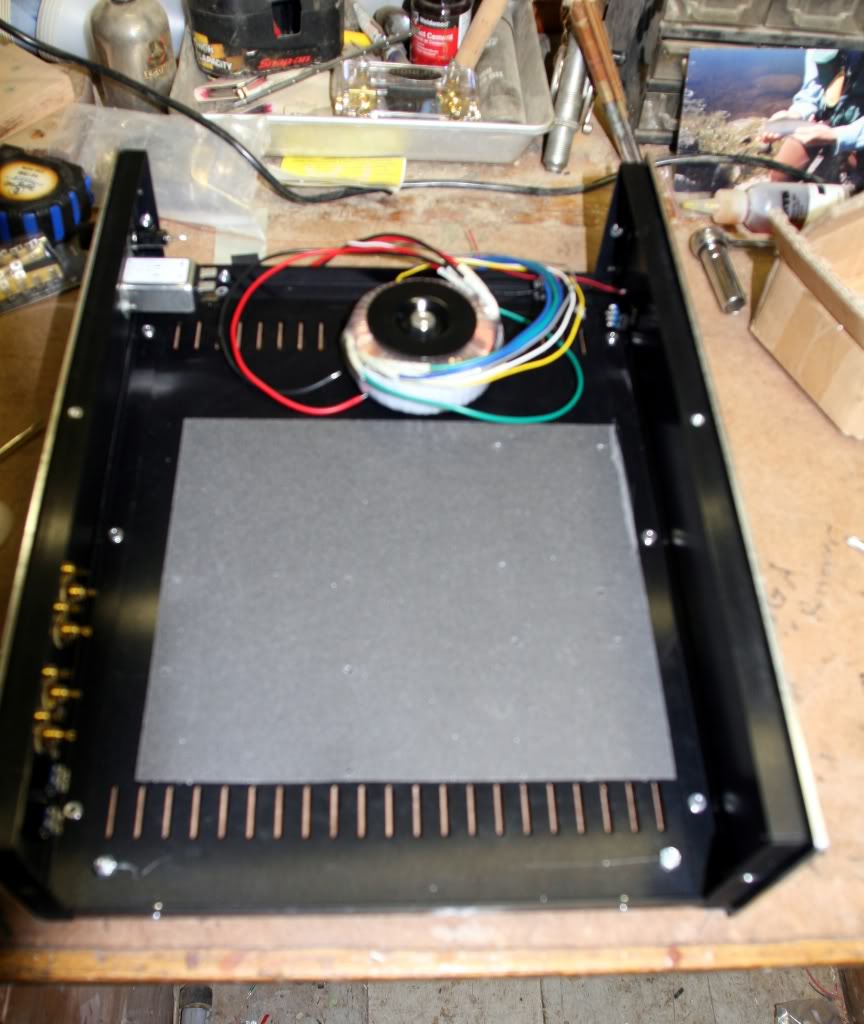
    Figuring out the layout .

    VTA PH15  build  IMG_4415

    VTA PH15  build  IMG_4417

    VTA PH15  build  IMG_4418

    VTA PH15  build  IMG_4420

    VTA PH15  build  IMG_4421

    VTA PH15  build  IMG_4422

    VTA PH15  build  IMG_4423

    VTA PH15  build  IMG_4425

    VTA PH15  build  IMG_4426

    VTA PH15  build  IMG_4431

    VTA PH15  build  IMG_4432

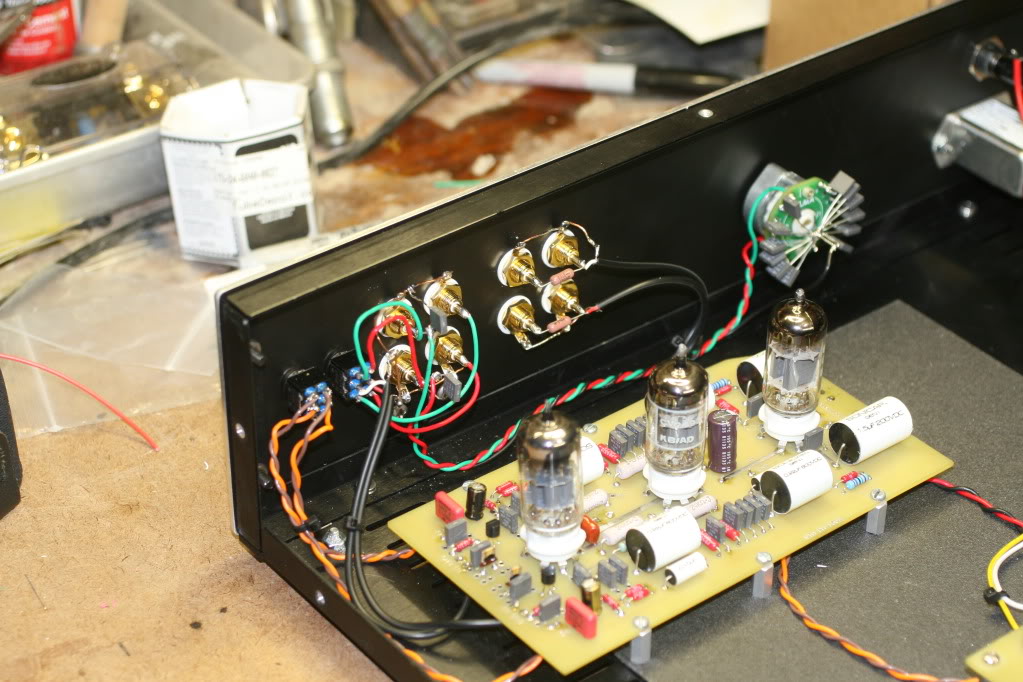
    First fire up with tubes in it , And luckily everything went A OK with no blown fuses again .

    VTA PH15  build  IMG_4435

    Now all I have to do is make room in the cabinet ! I built it to fit the old components perfectly not thinking I would ever upgrade them , now I have to do some creative juggling to make the new all fit .

    VTA PH15  build  IMG_4439

    I haven't listened to it much yet only a few albums but like I said before It is dead quiet . I was really happily suprised . It is much quieter than my S.S. PS Audio unit in my other system . Which I've never been fond of , maybe I'll sell it and build another one of these . Rolling Eyes

    So far it Sounds really nice , but it does seem a little "bright" sounding . But I think that is just the 20 year old Shure cartridge and A/M stylus there. It sounded like that with the old preamp/phono section.
    But its still brand new and hasen't been broken in yet . Cartridge upgrade coming when I get some money . Smile

    When I first plugged it in to the SP14 and turned it all on there was a loud humm coming from the speakers that had me thinking OH no. But I accidently pulled the out put rca's half wayout of the preamp in the process of plugging the PH15 in . But luckily re-plugging everything in fully fixed that ! Now I guess its time to listen and enjoy my vinyl again.


    WntrMute2
    WntrMute2


    Posts : 116
    Join date : 2010-11-21

    VTA PH15  build  Empty Re: VTA PH15 build

    Post by WntrMute2 Fri May 04, 2012 6:03 am

    Sure looks nicely done. Can you elaborate on where you cut the boards apart and how you then hooked them up?
    avatar
    pigface


    Posts : 85
    Join date : 2011-04-10
    Location : pittsburgh

    VTA PH15  build  Empty Re: VTA PH15 build

    Post by pigface Fri May 04, 2012 7:04 pm

    Its not hard . I basicly marked a line down the center of the board on the bottom side
    about 1/16” away from the standoff holes , and then marked off a short diaginal cut on
    one corner of the power supply side near the two can caps for room to drill a hole for a
    stand off . It’s a little close to a trace on the bottom side of the board but you can cut the
    board with out cutting it . Do the short diaginal cut first then the streight cut . I used my
    finest saw blade for the cut so it didn’t chip.

    Then I drilled the holes for the stand offs . I made five additional holes as there is only
    one left on this side after you cut it . I also made a stand off hole near the tube too for
    more support since the tube was hard getting in and out the first couple times . Be carefull
    and check BOTH sides of the board where you drill the holes for trace interference .

    The only trace you actually cut through is on the top of the board and is a ground , so
    when you mount the boards you just have to run an extra jumper wire for that ground
    connection . I just soldered a jumper wire on the power supply side near the cap where
    the trace is cut to a ground tap hole on the other board . You could probobly also put that
    power supply ground in the center ground tap hole that is between the two HV taps , there is
    enough room to put two wires up through that hole .

    If you look close in the 12th picture down you can see the ground and B+ tap holes I used
    right above the center tube . And in the 4th and 6th picture up from the bottom you can
    just see the ground wire soldered to the right side next to the blue capacitor .
    The two black and red wires are the B+ & ground connections .
    The two orange & brown wires are the 12v H+ H- connections . Three of these wires
    are made whether you cut the board or not the ground is the only extra wire connection I
    had to make .

    I don’t know whether it makes a difference or not to do this , It probobly would sound
    just as quiet one piece .
    Roy Mottram
    Roy Mottram
    Admin


    Posts : 1837
    Join date : 2008-11-30

    VTA PH15  build  Empty Re: VTA PH15 build

    Post by Roy Mottram Fri May 04, 2012 10:43 pm

    it's also quiet without cutting it in half
    also, if you want it in two pieces, the PH14 board is the same circuit and already in two pieces.

    also, just for everyone's info, I now have reverse RIAA PCB kits available (for testing),
    PM to inquire, not posted on my webpage yet
    avatar
    1MOR


    Posts : 19
    Join date : 2010-02-04

    VTA PH15  build  Empty Re: VTA PH15 build

    Post by 1MOR Fri May 18, 2012 5:53 pm

    Nice documentation and great pics. Thanks for posting!
    avatar
    pigface


    Posts : 85
    Join date : 2011-04-10
    Location : pittsburgh

    VTA PH15  build  Empty Re: VTA PH15 build

    Post by pigface Sat May 19, 2012 2:05 pm

    After a while of searching and reasearching I’ve finally decided on a cartridge. I wanted
    to try out a moving coil cartridge but did not want to get into stepup transformers so
    After considering the +’s and -’s of a number of different cartridges and also getting something
    in my current budget I decided on a Dynavector 20X2 high output MC cartridge .

    But while researching this cartridge different people liked the sound loaded at different
    loads. A couple people liked it at the reccomended load of 1000 ohms , some at around
    450 and another at 300 . I guess differences in their pre amps and gain and personal
    preferences played a part . So where to start .

    The turntable is a old Denon PF47F .

    VTA PH15  build  IMG_4451

    I didn’t want to have to pull the PH15 all apart to solder and unsolder resistors so I could
    change the loading then listen and then do it over if I didn’t like it there . So I started thinking
    and after more reaserch came up with this .
    It's a Goldpoint six position stereo selector switch . I loaded it up with dynavectors recomended 1000
    ohm load plus 100, 300 , 470 , 680 and 10k as a starting point . And in my reaserch it
    was recomended to install a 2.2m resistor to ground to prevent DC path issues that could
    harm the cartridge . (http://www.beavishifi.com/articles/Cartidge-Loading/index.htm )


    Here is what it looks like .
    VTA PH15  build  IMG_4441

    VTA PH15  build  IMG_4443

    All I did was have to drill a hole in the back panel , mount the switch , solder the 2.2m
    resistor to the RCA pin and ground , Then wire the common connections from the
    switch also to the RCA pin ( actually to the resistor metal lead ) and ground the other end of the resistors on the switch.

    VTA PH15  build  IMG_4445

    VTA PH15  build  IMG_4446

    VTA PH15  build  IMG_4447

    VTA PH15  build  IMG_4449

    It works like a charm . You can hear in real time what the load change sounds like and
    not have to guess if it really sounds better after an hour or so of resistor soldering.

    At the reccomended loading , at first the new cartridge didn’t sound much better than my
    old Shure cartridge but after a few hours and albums it is sounding much better . The bass has
    tightened up and the highs lost most of its brightness and th midrange is smoothed out . It’s sounding
    much better the longer it’s played so far .

    And playing around with the loading I think to me it sounds best at the 470 ohm load setting right now .
    I don’t know if that will change as things break in or not .

    Here is my setup . Ignore the wiring it's still a work in progress . The turntable is on a bracket mounted right to the brick part of the wall to prevent any vibrations from the floor .

    VTA PH15  build  IMG_4453
    My ST-120
    VTA PH15  build  IMG_4455
    avatar
    ruffian


    Posts : 43
    Join date : 2010-02-26

    VTA PH15  build  Empty Re: VTA PH15 build

    Post by ruffian Sat May 19, 2012 3:01 pm

    Wow, looks great. The variable resistance selector is something that I am thinking of doing. My thought is to mount it right in front of the inputs and use an extension rod/front control like I did on my SP14. And have the face etched up with the values.

    Very nice.
    avatar
    pigface


    Posts : 85
    Join date : 2011-04-10
    Location : pittsburgh

    VTA PH15  build  Empty Re: VTA PH15 build

    Post by pigface Sat May 19, 2012 7:57 pm

    I thought of putting it on the front but wanted to keep it neet looking , and didn't want the extra wire length to do that . I am able to easily access the switch on the back so it works out just as easy.

    ruffian, I'm kinda liking the sliver colored knobs on your SP14 , Almost more than my black ones . Nice job on it . Are you running all four Sylvania tubes ?
    avatar
    ruffian


    Posts : 43
    Join date : 2010-02-26

    VTA PH15  build  Empty Re: VTA PH15 build

    Post by ruffian Sun May 20, 2012 10:52 am

    pigface wrote:ruffian, I'm kinda liking the sliver colored knobs on your SP14 , Almost more than my black ones . Nice job on it . Are you running all four Sylvania tubes ?

    Those would be the Goldpoint knobs. I have 4 "Roy issue" Synvania GTB in the SP14 right now. I have not messed with any other tubes as of yet. There seems to ba a large variety of them out there.
    avatar
    pigface


    Posts : 85
    Join date : 2011-04-10
    Location : pittsburgh

    VTA PH15  build  Empty Re: VTA PH15 build

    Post by pigface Wed May 23, 2012 10:06 pm

    The more I listen to this the sweeter it seems to get . The sound just keeps getting better .
    I changed out the two Ediswan CV2492 gain stage tubes the other day and switched them with two Siemans E188CC gold pin tubes I got off ebay , These are supposed to be a Higher quality low noise version of the E88CC / 6922 tubes . These sound noticibly better .Wow . Not too much change in the high and low ranges but the midrange is much more defined and natural sounding. And the soundstage is almost wall to wall now .
    I also changed out the Mullard CV4003 output buffer tube with a Siemens E82CC and I did not like this one at all . The high end was much too bright with this tube, and the mids sounded muddy . This tube flared up on start up just like a Mullard tube does. So I put the Mullard back in for now .
    I'm getting a Amperex bugle boy and a Telefunken to try out in this position , so I will try these and see how they sound soon .
    I really like the two Seimens E188CC's in their positions so I don't think I will be changing them out any time soon .

    And after listening to this setup for a while I still think the new dynavector Cartridge sounds best at the 470 ohm load rather than the reccomended 1000 ohm .
    Roy Mottram
    Roy Mottram
    Admin


    Posts : 1837
    Join date : 2008-11-30

    VTA PH15  build  Empty Re: VTA PH15 build

    Post by Roy Mottram Fri May 25, 2012 8:51 pm

    nicely done! I'll have to add some DIP switches and load resistors on the next version, I never dreamed this new product would be so popular!
    It's my best selling unit now, more than SP14 and SP12. I'm adding one with a new turntable to my system.
    Is that an old Carver M200 amp, 2up from the SP14? I had one many years ago. Makes a good bass amp.
    avatar
    pigface


    Posts : 85
    Join date : 2011-04-10
    Location : pittsburgh

    VTA PH15  build  Empty Re: VTA PH15 build

    Post by pigface Fri May 25, 2012 10:56 pm

    Thanks. I highly recomend it I think you will like it . Twisted Evil
    Dip switches would probably be easier and probably allow for more adjustment , but with my small electronics knowledge the switch with resistors was easier for me to figure out . I might eventually fine tune the resistor load selection a little more, but for now it's working nice .
    The Carver is a M1.0t 200wpc.
    It was connected to a C-1 preamp . This was my first "good" stereo system , I bought them back in the very early 90's .Recently I thought one of them was going bad as the right channel was getting weak (Which is why I built the ST120 and SP14 to replace them ). But it turned out to be the Soundcraftsmen EQ being the culprit. That amp would really make my infinity kappa 8'S thump .


    Question: maybe someone can answer , lately when I turn the SP14 off I get a low crackling sound through the speakers that slowley bleeds off after two or three seconds until it's gone . Could I have a tube or a capacitor going bad causing this ? It only happens after its turned off and does not have any effect at all on the sound while it is turned on and playing . Is it something I should worry about ?

    Roy Mottram
    Roy Mottram
    Admin


    Posts : 1837
    Join date : 2008-11-30

    VTA PH15  build  Empty Re: VTA PH15 build

    Post by Roy Mottram Sat May 26, 2012 12:12 am

    that's just a normal sound of the amp dying out after loosing power.
    If it bothers you I've got a mute relay that could be added across the output jacks that would cut it off instantly.
    Or just add a simple switch to ground the outputs when you turn it on and off.
    jjones3318
    jjones3318


    Posts : 57
    Join date : 2011-04-05
    Location : Boulder, CO

    VTA PH15  build  Empty Re: VTA PH15 build

    Post by jjones3318 Mon May 28, 2012 11:46 pm

    pigface wrote:I changed out the two Ediswan CV2492 gain stage tubes the other day and switched them with two Siemans E188CC gold pin tubes I got off ebay , These are supposed to be a Higher quality low noise version of the E88CC / 6922 tubes . These sound noticibly better .Wow .

    If you want to get rid of them Mark, PM me.

    Sponsored content


    VTA PH15  build  Empty Re: VTA PH15 build

    Post by Sponsored content


      Current date/time is Fri May 17, 2024 7:23 am