The Dynaco Tube Audio Forum

Would you like to react to this message? Create an account in a few clicks or log in to continue.
The Dynaco Tube Audio Forum

Dedicated to the restoration and preservation of all original Dynaco tube audio equipment - Customer support for Tubes4hifi VTA tube amp and preamp kits and all Dynakitparts.com products


+8
pedrocols
vtshopdog
LeGrace
Dahlberg
Roy Mottram
aguaazul
Kentley
GP49
12 posters

    My KT120 / M-125's

    Dahlberg
    Dahlberg


    Posts : 132
    Join date : 2016-09-27
    Age : 63
    Location : Sweden

    My KT120 / M-125's Empty My KT120 / M-125's

    Post by Dahlberg Sun Oct 16, 2016 6:49 pm

    Ok.
    Build threads are always fun so here goes. Started of with some paint job, primer first that went fairly well.
    Put a layer of copper paint on as well that will need some additional work before I'm satisfyed. I actually
    thought of dropping the paint job all together last night, it looked like total crap but this morning it sort of
    had settled a bit and didn't look that bad. Well a few more layers and it will look nice (i hope).

    I have recived all parts and everything has gone smothly. Ebay global shipping (the amps) was a bit frustrating
    at first but it all worked out very well.

    My KT120 / M-125's Primer


    Last edited by Dahlberg on Tue Oct 18, 2016 5:56 am; edited 1 time in total
    Dahlberg
    Dahlberg


    Posts : 132
    Join date : 2016-09-27
    Age : 63
    Location : Sweden

    My KT120 / M-125's Empty Re: My KT120 / M-125's

    Post by Dahlberg Mon Oct 17, 2016 10:42 am

    I was asked over PM if I was going to paint the chassies as well and if so, how? No I will
    not. But if, I would either start of with an acid-primer (used mainly for painting aluminum)
    and after that applying the top coat. Next alternative would be to go for powder coating.
    Dahlberg
    Dahlberg


    Posts : 132
    Join date : 2016-09-27
    Age : 63
    Location : Sweden

    My KT120 / M-125's Empty Re: My KT120 / M-125's

    Post by Dahlberg Tue Oct 18, 2016 5:53 am

    Spray painting isn't something I like to do and next time I will just leave it to someone else for powder coating.

    So for the last time then, I went for gold instead of copper.

    My KT120 / M-125's Gold_01
    Dahlberg
    Dahlberg


    Posts : 132
    Join date : 2016-09-27
    Age : 63
    Location : Sweden

    My KT120 / M-125's Empty Re: My KT120 / M-125's

    Post by Dahlberg Tue Oct 18, 2016 10:35 am

    Some bad lighting and my mobile created this.  Embarassed  Well it gives a feel for the colours at least.

    My KT120 / M-125's Gold_02
    LeGrace
    LeGrace


    Posts : 390
    Join date : 2016-08-07
    Location : Ontario, Canada

    My KT120 / M-125's Empty Re: My KT120 / M-125's

    Post by LeGrace Tue Oct 18, 2016 2:31 pm

    Should look really nice when done. Looking forward to more updates.
    Dahlberg
    Dahlberg


    Posts : 132
    Join date : 2016-09-27
    Age : 63
    Location : Sweden

    My KT120 / M-125's Empty Re: My KT120 / M-125's

    Post by Dahlberg Tue Oct 18, 2016 2:57 pm

    Coming up Smile

    My KT120 / M-125's Walnut_01
    avatar
    GP49


    Posts : 792
    Join date : 2009-04-30
    Location : East of the sun and west of the moon

    My KT120 / M-125's Empty Re: My KT120 / M-125's

    Post by GP49 Wed Oct 19, 2016 2:20 am

    Are you baking the enamel to harden it beyond what air-drying can do?
    Dahlberg
    Dahlberg


    Posts : 132
    Join date : 2016-09-27
    Age : 63
    Location : Sweden

    My KT120 / M-125's Empty Re: My KT120 / M-125's

    Post by Dahlberg Wed Oct 19, 2016 4:33 am

    No I haven't done that. Could you please give me some hints if you have them ?
    Dont forget that we use the owen for cooking as well Cool

    Edit: Baking in progress, 100C° for 1 hour. Doesn't smell to bad Cool
    Wonder if the Mrs agrees Embarassed


    Last edited by Dahlberg on Wed Oct 19, 2016 6:13 am; edited 1 time in total
    avatar
    GP49


    Posts : 792
    Join date : 2009-04-30
    Location : East of the sun and west of the moon

    My KT120 / M-125's Empty Re: My KT120 / M-125's

    Post by GP49 Wed Oct 19, 2016 5:47 am

    The principle is that enamel paints first dry by evaporation of solvents, and then cure and harden slowly by oxidation. At room temperatures the process is never complete but heat accelerates it and results in a harder finish, though not as hard or durable as powder coating.

    It doesn't work on lacquer or catalyzed two-part paints and how well it works on enamel can vary with paint formulation and paint thickness.

    In general, 350F for about a half hour is what it takes. Test it out first on a scrap piece with your particular paint, if you try it.
    Dahlberg
    Dahlberg


    Posts : 132
    Join date : 2016-09-27
    Age : 63
    Location : Sweden

    My KT120 / M-125's Empty Re: My KT120 / M-125's

    Post by Dahlberg Wed Oct 19, 2016 6:18 am

    GP49 wrote:The principle is that enamel paints first dry by evaporation of solvents, and then cure and harden slowly by oxidation.  At room temperatures the process is never complete but heat accelerates it and results in a harder finish, though not as hard or durable as powder coating.

    It doesn't work on lacquer or catalyzed two-part paints and how well it works on enamel can vary with paint formulation and paint thickness.

    In general, 350F for about a half hour is what it takes.  Test it out first on a scrap piece with your particular paint, if you try it.

    They have been in for 45minutes so I'm rising the temp to 150C° for the last 15 minutes. Cool

    Edit: Done

    My KT120 / M-125's Gold_03
    Dahlberg
    Dahlberg


    Posts : 132
    Join date : 2016-09-27
    Age : 63
    Location : Sweden

    My KT120 / M-125's Empty Re: My KT120 / M-125's

    Post by Dahlberg Wed Oct 19, 2016 7:04 am

    It seems to have gone well, thanks for the tip Smile
    Looking at them now I belive I will by another can of paint and go
    over them once again being a bit more thorough and also make sure
    not to touch anything before "baking".
    Dahlberg
    Dahlberg


    Posts : 132
    Join date : 2016-09-27
    Age : 63
    Location : Sweden

    My KT120 / M-125's Empty Re: My KT120 / M-125's

    Post by Dahlberg Wed Oct 19, 2016 9:14 am

    And now the fun begins  Very Happy

    My KT120 / M-125's Walnut_02
    avatar
    GP49


    Posts : 792
    Join date : 2009-04-30
    Location : East of the sun and west of the moon

    My KT120 / M-125's Empty Re: My KT120 / M-125's

    Post by GP49 Wed Oct 19, 2016 10:29 am

    Dahlberg wrote:It seems to have gone well, thanks for the tip Smile
    Looking at them now I belive I will by another can of paint and go
    over them once again being a bit more thorough and also make sure
    not to touch anything before "baking".

    Looking at them up close you probably can see how the paint thickness has reduced compared to pre-baking, as the paint film cured. The technique is used a lot by car hobbyists and restorers on small metal parts. I've noticed that the baked enamel holds up a lot better under the hood in the heat of the engine.

    They look great! Be sure to thoroughly clean and re-prep the parts before respraying, but I'm sure you are doing that already.
    Dahlberg
    Dahlberg


    Posts : 132
    Join date : 2016-09-27
    Age : 63
    Location : Sweden

    My KT120 / M-125's Empty Re: My KT120 / M-125's

    Post by Dahlberg Wed Oct 19, 2016 11:40 am

    I will go over them with some additional care before the last (?) layer of paint,
    and yes, I belive that you are right about the thickness of the paint.
    I was thinking of an additional layer of clear coat on top of the gold finish but
    it doesn't  seem that necessary. Also a risk of spoiling the hole thing so....

    And another picture  Smile

    My KT120 / M-125's Walnut_03
    Dahlberg
    Dahlberg


    Posts : 132
    Join date : 2016-09-27
    Age : 63
    Location : Sweden

    My KT120 / M-125's Empty Re: My KT120 / M-125's

    Post by Dahlberg Thu Oct 20, 2016 3:32 pm

    I'm putting all painted parts in the oven tomorrow Cool Put on a clear coat as well
    and if I'm reading it right that will also stand up to the baking process.

    Didn't work Sad It was probably to hot or something, but now there are some
    bubbles inside the paint. Crying or Very sad I don't have the time for this so I'm going for
    powdercoating instead.
    Dahlberg
    Dahlberg


    Posts : 132
    Join date : 2016-09-27
    Age : 63
    Location : Sweden

    My KT120 / M-125's Empty Re: My KT120 / M-125's

    Post by Dahlberg Sat Oct 22, 2016 11:43 am

    A lid over the pcb's  Smile  Will be painted the same colour, candy gold  Smile

    My KT120 / M-125's Lid_01

    My KT120 / M-125's 4pc-candy-gold-bar-set-speed-500
    LeGrace
    LeGrace


    Posts : 390
    Join date : 2016-08-07
    Location : Ontario, Canada

    My KT120 / M-125's Empty Re: My KT120 / M-125's

    Post by LeGrace Sat Oct 22, 2016 12:43 pm

    Amazing build! Keep the pics coming!
    Dahlberg
    Dahlberg


    Posts : 132
    Join date : 2016-09-27
    Age : 63
    Location : Sweden

    My KT120 / M-125's Empty Re: My KT120 / M-125's

    Post by Dahlberg Sat Oct 22, 2016 5:59 pm

    About the paintjob Cool Everything looked great untill I turned
    it up to 150C°. At 100C° /45min it looked ok and if I would
    have stopped there I would have been  Very Happy cheers

    Well maybe I will spraypaint some other time, but not on this project Cool
    Dahlberg
    Dahlberg


    Posts : 132
    Join date : 2016-09-27
    Age : 63
    Location : Sweden

    My KT120 / M-125's Empty Re: My KT120 / M-125's

    Post by Dahlberg Wed Oct 26, 2016 6:36 am

    Smile

    My KT120 / M-125's Pcb_01
    Dahlberg
    Dahlberg


    Posts : 132
    Join date : 2016-09-27
    Age : 63
    Location : Sweden

    My KT120 / M-125's Empty Re: My KT120 / M-125's

    Post by Dahlberg Fri Oct 28, 2016 7:23 am

    I had an idea to buy something like this to put on the front as an ac-switch.

    My KT120 / M-125's 701308_LB_02_FB.EPS_1000

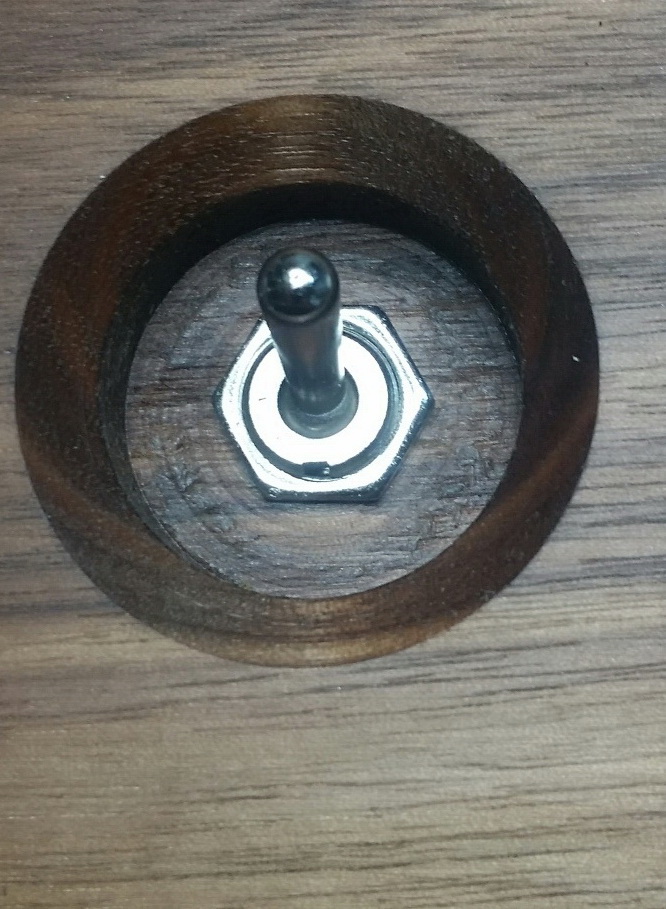
    Or do something like this, probably with a sligthly smaller hole. I'm leaning in this
    direction, just have to figure out how to get the finnish done in the bottom of the hole.

    My KT120 / M-125's Front_01
    Dahlberg
    Dahlberg


    Posts : 132
    Join date : 2016-09-27
    Age : 63
    Location : Sweden

    My KT120 / M-125's Empty Re: My KT120 / M-125's

    Post by Dahlberg Fri Oct 28, 2016 7:46 am

    Another idea would be to put the ac switch where the speaker connectors
    are placed. Make a hole between the ac switch and the ac inlet for the
    fuseholder and make room for the speaker connectors between the
    ac-inlet and the rca connector. It would require some metalwork though.
    Everything moves backwards due to the wooden frame so it seems to be
    enough space.

    My KT120 / M-125's M-125-wiring
    Dahlberg
    Dahlberg


    Posts : 132
    Join date : 2016-09-27
    Age : 63
    Location : Sweden

    My KT120 / M-125's Empty Re: My KT120 / M-125's

    Post by Dahlberg Mon Oct 31, 2016 5:14 am

    Nothing from the paintshop yet so, a little side project Cool

    My KT120 / M-125's Weber

    Not sure if I will ever use them but if I do they will look nice enough Smile
    Dahlberg
    Dahlberg


    Posts : 132
    Join date : 2016-09-27
    Age : 63
    Location : Sweden

    My KT120 / M-125's Empty Re: My KT120 / M-125's

    Post by Dahlberg Mon Oct 31, 2016 8:18 pm

    Not done but close enough to get the idea.

    My KT120 / M-125's Backside_01
    LeGrace
    LeGrace


    Posts : 390
    Join date : 2016-08-07
    Location : Ontario, Canada

    My KT120 / M-125's Empty Re: My KT120 / M-125's

    Post by LeGrace Tue Nov 01, 2016 4:59 pm

    Look forward to seeing more! Anticipation....
    Dahlberg
    Dahlberg


    Posts : 132
    Join date : 2016-09-27
    Age : 63
    Location : Sweden

    My KT120 / M-125's Empty Re: My KT120 / M-125's

    Post by Dahlberg Tue Nov 01, 2016 5:24 pm

    I got the GZ37 rectifiers yesterday Smile  Mullards this time Cool I'm still waiting for
    the transformer parts, maybe I should give the paint guys all call tomorrow.

    Stainless steel is a real pain to modify  Idea  Sad

    I'm hoping to post some pictures of a more finished project before the weekend. Lets see how that pans out Laughing

    Sponsored content


    My KT120 / M-125's Empty Re: My KT120 / M-125's

    Post by Sponsored content


      Current date/time is Fri Nov 15, 2024 2:40 am