The Dynaco Tube Audio Forum

Would you like to react to this message? Create an account in a few clicks or log in to continue.
The Dynaco Tube Audio Forum

Dedicated to the restoration and preservation of all original Dynaco tube audio equipment - Customer support for Tubes4hifi VTA tube amp and preamp kits and all Dynakitparts.com products


+14
jjones3318
peterh
skriefal
arledgsc
Sprags
ruffian
Luddite
Roy Mottram
Maintarget
baddog1946
Bob Latino
corndog71
ramon68
sKiZo
18 posters

    Custom Chassis?

    sKiZo
    sKiZo


    Posts : 1530
    Join date : 2013-04-01
    Location : Michigan USA

    Custom Chassis? - Page 2 Empty Re: Custom Chassis?

    Post by sKiZo Wed Apr 24, 2013 9:16 pm

    Serious hardware there ... my amp wants to grow up to be just like yours ...

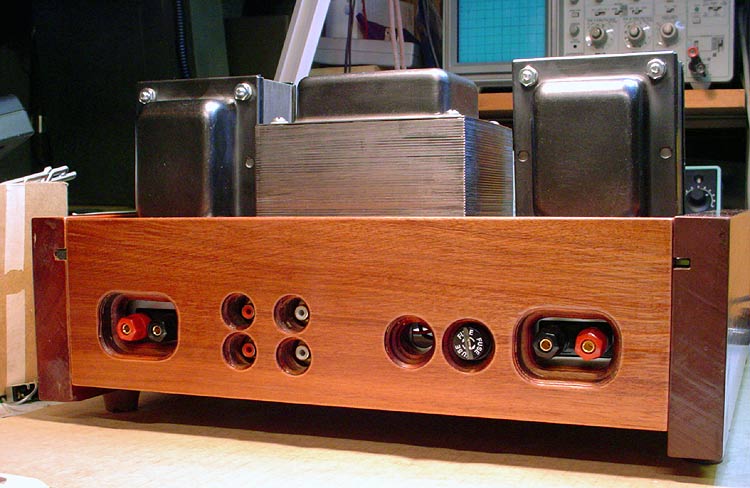
    Where'd ya get the rotary switch? I was looking for one in case I decide to go with just one meter. If I stick with the two, I'll just do the front/rear switches for each bank.

    One other minor change on mine - a couple nice bat handle toggle switches instead of the sliders. Tried cutting a square hole today with the dremel and although it worked, it wasn't as clean as I'd like. Round holes are much easier. Grainger has a nice punch ... for only $80. I'll pass ...
    avatar
    ruffian


    Posts : 43
    Join date : 2010-02-26

    Custom Chassis? - Page 2 Empty Re: Custom Chassis?

    Post by ruffian Wed Apr 24, 2013 10:11 pm

    sKiZo wrote:I'd think the biggest benefit would be reduced heat.

    Why do you say there would be less heat? Aren't the chokes, no matter what the size doing exactly the same work? So their heat output essentially should be the same? True with one much larger there will be more mass to dissapate that heat, hence a perception of it 'running cooler', but won't the heat output be exactly the same?
    sKiZo
    sKiZo


    Posts : 1530
    Join date : 2013-04-01
    Location : Michigan USA

    Custom Chassis? - Page 2 Empty Re: Custom Chassis?

    Post by sKiZo Thu Apr 25, 2013 12:07 am

    OK ... semantics really ... let's call it less warm as opposed to less heat? The increased surface area and greater mass should allow whatever heat is created to percolate to air faster, which technically means the choke should run cooler.

    Can't really comment on the efficiency of the larger choke in the circuit, but that could also work to reduce waste heat.

    No comment on the pros or cons of moving the bias trimmer pots off the driver board, so I'll plan to do that also using the B50k linear pots I mentioned earlier. Got those, some knobs, and a neat little pushbutton power switch coming, and I think that's the last of the parts I'll need. Should be able to get started when the metal shows ...


    baddog1946
    baddog1946


    Posts : 319
    Join date : 2010-02-03
    Location : Costa Rica

    Custom Chassis? - Page 2 Empty Re: Custom Chassis?

    Post by baddog1946 Thu Apr 25, 2013 5:59 am

    Skizo:
    Here is what the raw plate looked like before it was bent at a metal shop in a sheet metal brake. This was also back cut on the bend lines and notice there are no stress lines in the earlier picture in this thread.
    I strongly recommend bending in a shop as 2.5 mm. is a lot stiffer than you might think. Cost me $15
    I had a couple of failures with stress lines bending another one at home because the bending pressure needs to be evenly distributed across the entire bend length or you WILL! have stress lines.
    The rotary switch is a "Lorlin" CK series from Mouser. I used a "Shurter IEC power input module with both the on/off switch and fuse cartridge onboard . No slider or other power switches are needed. Less holes, easier and/or cheaper.
    Good luck. I like your enthusiasm


    Custom Chassis? - Page 2 PT4006

    FYI:
    Toroid transformer:Custom 800VDC "Sumner"
    Custom Chassis? - Page 2 ToroidTransformer-1

    Custom Chassis? - Page 2 800V500MatoroidforKT12001
    sKiZo
    sKiZo


    Posts : 1530
    Join date : 2013-04-01
    Location : Michigan USA

    Custom Chassis? - Page 2 Empty Re: Custom Chassis?

    Post by sKiZo Thu Apr 25, 2013 11:36 am

    It's my enthusiasm that usually gets me into trouble. This started out as a simple kit build. dOH!

    You've obviously got the bug too, and a lot more practice than me.

    *****

    Naked toroid!!

    Custom Chassis? - Page 2 Pwr_toroid

    Quality stuff. The efficiency is really quite amazing. And they're much purtier than a standard stack. I've got em in my Sansui QRX-9001 and 8080db and they never really seem to be working all that hard ...

    *****

    I did notice the power setup in one of your earlier picks, but my amp is gonna be fairly high up and the back will be kinda hard to get to, so I like the idea of a front panel switch. Here's what I got ...

    Custom Chassis? - Page 2 41%2BO4jF2cUL

    Another advantage of a bigger chassis ... thing takes up a lot of real estate! It's got a blue annular ring LED light - not sure whether I'll use that or not as LEDs can be a bit noisy. And it might detract from the glow of the tubes. sunny Maybe hide a mini toggle to make the light optional.

    < < < DIY METAL BRAKE > > >

    As said I'm gonna go with a separate back panel, so the only bend will be the angle for the front panel. That should be around 30 degrees at most. Found this on YouTube ...

    Custom Chassis? - Page 2 Diy-sheet-metal-brake

    https://www.youtube.com/watch?v=xQlHqdudPvU

    Might be just the ticket. Only thing I'd do is roll the edge of the top angle iron for a softer bend, or maybe try it with some scrap using a piece of steel pipe instead. Not much of an investment - zero really - as I have all the parts kicking around the shop anyway. I did order two blanks, so if I screw one up, I can always beat it flat for the chassis bottom and take the other one down the road to a real metal shop.

    Switch - shorting or non-shorting. Got a number?
    baddog1946
    baddog1946


    Posts : 319
    Join date : 2010-02-03
    Location : Costa Rica

    Custom Chassis? - Page 2 Empty Re: Custom Chassis?

    Post by baddog1946 Thu Apr 25, 2013 12:35 pm

    One thing on that purdy toroid you show: Take a look at mine. I had all the wires clustered together on each side so I only need two holes in the plate. That one you show they are strung out and you will have to make a lot of holes to mount it on top of the plate. Mine only needs 2 and they are hidden underneath. Otherwise reach for your wallet and buy a can for it that covers them. that makes it bigger as well. Hope you have the room.
    sKiZo
    sKiZo


    Posts : 1530
    Join date : 2013-04-01
    Location : Michigan USA

    Custom Chassis? - Page 2 Empty Re: Custom Chassis?

    Post by sKiZo Sun May 12, 2013 1:27 pm

    Progress report ...

    Not much, really. Got caught up in spring gardening and a couple outdoor construction projects.

    Got the metal for the chassis plate, and that didn't go all that well. Got some good "accurate" sockets, bu t they just didn't have that "finished" look I was aiming for. Didn't like the look or tone of the unfinished metal either. Could have lived with that, but killer was that my drill press didn't have a deep enough throat to do the rectifier socket, so ... ordered a simplified version of the panel from FPE - it should be here next week. Here's the final version as ordered.

    Custom Chassis? - Page 2 Fpe-panel-ordered

    This does the CNC work for all the holes with exposed edges, and the two up front for the meters which are bigger than my bits. Keeps the costs down enough I was able to add back the "purty" around the pentode/triod switches. Any holes that will have covered edges after assembly, I'll do myself. The back plate will be machined separately and inserted into a cutout in the wood case. That I can do too.

    I'm also planning to leave the transformers naked, with just a couple coats of Never Dull to polish them up. I may regret that, but they do look right nice at the moment. Never Dull is a good metal protectant (made for motorcycle chrome) so I don't expect any rust issues, and I can always touch them up later if needed. The bells surprised me - turned out a nice silvery gray semi metallic finish just rubbing them smooth with some 00 3M pads and the Never Dull wadding. Moderation is the key as too much and you'll rub the finish off.

    Got all the parts ... I'm running out of excuses for not gittin er done!

    PS ... got the switch ... it's got a real solid feel to it. Still debating on whether to wire it for the annular light ... cross that connection when I get to it. Hopefully not literally.
    sKiZo
    sKiZo


    Posts : 1530
    Join date : 2013-04-01
    Location : Michigan USA

    Custom Chassis? - Page 2 Empty Re: Custom Chassis?

    Post by sKiZo Wed May 15, 2013 9:57 am

    Something ya gotta love about Panel Express ... they certainly do keep you informed on progress.

    Custom Chassis? - Page 2 Panel-order-progress

    In case anyone is wondering about the "infill" part, that's the ink fill on any printing. I did get one gratuitous bit of bling in the design.

    Custom Chassis? - Page 2 Pt-switch-design

    One check mark I'd like to see is "Buyer didn't make any really stupid mistakes during the design phase." tongue
    avatar
    Sprags


    Posts : 123
    Join date : 2013-02-27

    Custom Chassis? - Page 2 Empty Re: Custom Chassis?

    Post by Sprags Wed May 15, 2013 11:48 am

    Machining a groove to thin the sheet aluminum where the bend is going to be is is a good idea. Use a ball nose cutter and perhaps round off any sharp edges the cutter may create before bending to reduce stress risers in the material. Another possibility to help hide stress marks is to perhaps anodize the aluminum after forming. Just a couple of suggestions. Blake
    sKiZo
    sKiZo


    Posts : 1530
    Join date : 2013-04-01
    Location : Michigan USA

    Custom Chassis? - Page 2 Empty Re: Custom Chassis?

    Post by sKiZo Wed May 15, 2013 12:18 pm

    I decided against the groove ... that silly little back cut added a LOT to the cost of the panel for whatever reason. Multiple passes, flip and new CNC program, that kind of stuff. I figure to do a more gradual bend with a fairly moderate curve to it and keep my fingers crossed. Here's a quick and dirty concept drawing I did a while back ...

    Custom Chassis? - Page 2 FPD14-front-panel-bent

    Lots of changes to the design since then, and excuse the funny looking stuff on the front panel. That all got some serious parallax issues when I "bent" the panel in photoshop.

    PS ... now that it's too late, I'm thinking what I SHOULD have done was add a few closely spaced shallow relief cuts on the front of the panel right at the bend. That would have covered up any stress marks (which knock on wood, I won't get anyway) and also tend to act as guides to keep the bend where it belongs. Also, I think it would have added a nice touch to the looks. Ah, well ... next time. If I DO get some stress marks, I can always add some pinstripe tape ... waddaya think ... flames or chains ...

    Custom Chassis? - Page 2 Pinstripe

    I think I got some skulls here somewhere too. tongue
    sKiZo
    sKiZo


    Posts : 1530
    Join date : 2013-04-01
    Location : Michigan USA

    Custom Chassis? - Page 2 Empty Progress

    Post by sKiZo Mon Jun 03, 2013 8:57 am

    OK then ... got the panel back last week and drilled all the mounting holes (well, most of them anyway). Here's the first dry fit from the top.

    Custom Chassis? - Page 2 Chassis-top-fit-01

    Quite happy with it ... definitely different. One of my major concerns was adding space between the bottles, and that worked out right nice. There's even plenty of breathing room between the big bottle rectifier and the transformer.

    Custom Chassis? - Page 2 Chassis-top-fit-02

    Excuse the wandering knobs ... the small ones next to the driver tubes in this pic are for the bias pots. Once I got the tubes in, I can see where that would have made for a lot of tender fingers. Just as well to put them on the front panel. Only change there is now the power switch and light will move to the wood front of the chassis. There will also be a couple mini-switches between the meters so I can switch from front to back on each bank when reading or adjusting bias.

    Speaking of driver tubes ...

    sKiZo
    sKiZo


    Posts : 1530
    Join date : 2013-04-01
    Location : Michigan USA

    Custom Chassis? - Page 2 Empty The driver board ...

    Post by sKiZo Mon Jun 03, 2013 9:03 am

    I'm sure I posted these up earlier, but what's a few more pixels ...

    My chassis plate was designed to recess the driver board with only the glass of the tubes showing. That required relocating the big caps (C13-C16) to the bottom of the board. That done, the tallest part of the board is the sockets themselves. Here's the finished product ...

    Custom Chassis? - Page 2 Vta-board-done

    One nice feature of the board is that both sides have solder tabs so you can flow thru the board and get real solid contact. This was a BIG advantage with swapping the caps to the other side. I just put a temporary riser under each so I got a bit of air space and could also inspect the joints for good flow both sides. Here's what it looks like from the bottom ...

    Custom Chassis? - Page 2 Pio-caps

    I also had some fun with the PIO coupling caps, adding a heatshrink cover and custom printed labels to pretty them up. There's always a chance of shorting the standard bare metal cases to ground or worse, so there's actually a practical side to the mod.

    Unfortunately, I already had the board built before I decided to replace the original board mount bias adjusters with standard pots. I'll have to pop those pretty PIO's to remove those and add twisted wire long enough to reach the new 50k pots on the front panel. Not a perfect world, and I'm here to keep it that way! tongue

    Speaking of not perfect. Somehow or other I missed the target when drilling the mounting holes for the VTA driver board. That put the glass envelopes right up against the back of the holes in the chassis plate. dOH! Easy fix though ... The board is mounted about an inch below the chassis plate and I was able to bend the bolts just a bit to center the tubes. Shhhh ... I won't tell anybody if you don't ...

    More later ...
    sKiZo
    sKiZo


    Posts : 1530
    Join date : 2013-04-01
    Location : Michigan USA

    Custom Chassis? - Page 2 Empty About the tubes ...

    Post by sKiZo Mon Jun 03, 2013 9:13 am

    The rectifier is a NOS 1972 Philips 5R4GYS built in Holland. Same factory that did the Amperex Bugle Boys, so I have real high hopes for the sound. Parts Connexion was running a special on them for $40 - they usually go for around $55.

    Only real difference in the spec is the voltage drop is a lot higher than the usual 5AR4 varieties. I'm told I may lose a couple watts output, but I don't see that as a problem. The KT-120 power tubes have loads of reserve in this amp and I may even come out ahead. Plus, I get the big bottle look and reserve of the GZ-37, at half the price.

    Just to be on the safe side, I do plan to run a Weber WZ68 Copper Cap solid state rectifier when I first fire it up and until I verify the build. I've also got a Mullard 5AR4, an Amperex 5AR4, and a Shuguang 5AR4 here, so I'll be able to roll some and take notes. I'll also be doing the diode mod on the rectifier socket - better safe than sorry.

    The TungSol KT-120's are also some real beasts - IF your transformer can handle the load - not a problem here. Reviews are that the bass is exceptionally crisp and strong, the midrange is real sweet, and the highs are detailed yet not shrill. Very comfortable listen across the range ... Who could ask for more? They can do 150 watts in a standard push/pull configuration if the amp is designed around them. Won't get anywhere near that with the ST-120 due to limits in the amp itself, but ... I'm thinking that's a good thing. Won't be driving them hard at all - at those levels they should have long happy lives and be impervious to anything I can throw at them. Bonus - they're actually cheaper than a premium tube like the ever popular SED Winged C ...
    Bob Latino
    Bob Latino
    Admin


    Posts : 3265
    Join date : 2008-11-26
    Location : Massachusetts

    Custom Chassis? - Page 2 Empty Re: Custom Chassis?

    Post by Bob Latino Mon Jun 03, 2013 9:37 am

    Re: > "The TungSol KT-120's are also some real beasts - IF your transformer can handle the load - not a problem here."

    Yes > Before I recommended the KT120's for use in the VTA ST-120, I ran 4 KT120's in my own VTA ST-120 @ 75 milliamps per tube (bias setting .750 VDC instead of .550 VDC) for 5 hours. The .750 VDC higher bias setting requires the power transformer to supply current to the KT120's at a rate 36% higher than the normal  affraid  .550 VDC recommended bias setting. (NOTE - As of June 2016 the recommended bias setting on the VTA ST-120 amp has been lowered to .500 VDC per each output tube. The amp will sound the same and your output tubes will last longer) The power transformer did get warmer than normal but the amp played fine with no issues. NOTE - I don't recommend anyone with a VTA ST-120 to run KT120's @ 75 millamps per tube. If you do run the KT120's @  75 milliamps, your KT120's will wear out sooner, the rectifier will be stressed out and there will be no increase in "sound quality" from the amp.

    Bob


    Last edited by Bob Latino on Sun Jul 17, 2016 8:29 am; edited 1 time in total
    sKiZo
    sKiZo


    Posts : 1530
    Join date : 2013-04-01
    Location : Michigan USA

    Custom Chassis? - Page 2 Empty Re: Custom Chassis?

    Post by sKiZo Mon Jun 03, 2013 11:20 am

    Yup ... I was reading your initial evaluation of the tubes and the results of your testing. I also remember you mentioning there was no discernible difference in sound quality with the higher settings, so ... back down to .55vdc ...

    Speaking of bias ... I found some real nice meters. Ya, I know ... who needs em ... but ... Bling! tongue

    Most of the ones I found were either the wrong scale or hard to read. Found these at JameCo's eBay store and thought they looked perfect for the job.

    Custom Chassis? - Page 2 $(KGrHqF,!jcE9KySKwZNBPjzSo5LPQ~~60_1

    Didn't expect much for $10 a pop, but they feel solid. I'll be putting test jacks in too, so I'll be able to verify their accuracy over time. I'll use one per bank and just add a mini SPDT for each to select the front or back tube on that bank.
    corndog71
    corndog71


    Posts : 840
    Join date : 2013-03-19
    Location : It can get windy here

    Custom Chassis? - Page 2 Empty Re: Custom Chassis?

    Post by corndog71 Mon Jun 03, 2013 1:55 pm

    That looks pretty slick! Nice job!
    baddog1946
    baddog1946


    Posts : 319
    Join date : 2010-02-03
    Location : Costa Rica

    Custom Chassis? - Page 2 Empty Re: Custom Chassis?

    Post by baddog1946 Mon Jun 03, 2013 5:30 pm

    Nice job! You actually finished it! My problem is that I keep getting into mods and now I am re-designing a new improved power supply. Good thing I have lots of perf board to experiment with before I order the PCB's. Make sure you put up some pics of the wood base and finished amp.
    sKiZo
    sKiZo


    Posts : 1530
    Join date : 2013-04-01
    Location : Michigan USA

    Custom Chassis? - Page 2 Empty Re: Custom Chassis?

    Post by sKiZo Mon Jun 03, 2013 6:28 pm

    I got a long ways to go before it's "finished", but I'll post up on any major changes.

    Also ordered a back plate from FPE today. I was gonna cut that myself but they do a much nicer job.

    Custom Chassis? - Page 2 Chassis-backplate

    The back of the case will be a wood panel with a cutout for this plate. Here's hoping I sized the holes right for the fuse and plug holders.

    PS ... I'll be using RCA gold panel jacks for the input. If anyone's wondering why two sets, I currently drive my amps off a Sansui quad and use a loop adapter on the back of the amp.

    Custom Chassis? - Page 2 Tapeloop-mc2205

    I figure as long as it's a scratch build, put the loopback right in the chassis. I'll just bridge each set of jacks internally.

    Oh. And I know what you mean about changing things. My job's easier as there's not many circuit changes to deal with, but as for the rest, I'm pretty much making it up as I go along. Got a good idea of what I want, just not exactly how it's gonna get done. That's the fun part!
    sKiZo
    sKiZo


    Posts : 1530
    Join date : 2013-04-01
    Location : Michigan USA

    Custom Chassis? - Page 2 Empty Re: Custom Chassis?

    Post by sKiZo Sun Jun 09, 2013 5:14 pm

    OK then ... rainy day, so good time to dry fit the bottom. Let me know if I forgot anything. tongue

    Custom Chassis? - Page 2 Dry-fit-bottom-002

    Nice to have some more room to play with. Those big chokes look right at home there, and I won't even need to add any extra holes to mount them as they line up quite close to the output xformer mounting points. Not quite - I'll have to ream the holes a bit to handle the slight offset, and maybe add some washers under the nuts.

    Also plenty of room for the can cap. I'll make a couple strap mounts for that and attach to the chassis using the output xformer mounting hardware.

    Haven't drilled the holes for the controls on the front panel yet, but I'm pretty sure that's how it's gonna work. Two stepped attenuators wired as mono so I can adjust balance, and the annular power switch on the left. The quad of 50k pots is for bias, and I'll also have standard pin test jacks between the meters for a VOM hookup. I know I don't need two ground pin jacks - it's a symmetry kinda thang. Oh, and the black line is where the panel will bend for the front control surface. I'll get all the holes drilled before I tackle that.

    While I'm at it ... the SCM's are a tight fit on the standard chassis, but they actually get sorta lost in this one.

    Custom Chassis? - Page 2 Dry-fit-bottom-006

    Lots of room to grow them up ... any advantages to going larger than the standard pair of 330μF 400v? The chokes and large caps facing down on the driver board already dictate the final depth of the wooden base.
    Bob Latino
    Bob Latino
    Admin


    Posts : 3265
    Join date : 2008-11-26
    Location : Massachusetts

    Custom Chassis? - Page 2 Empty Re: Custom Chassis?

    Post by Bob Latino Sun Jun 09, 2013 5:52 pm

    Re; >"any advantages to going larger than the standard pair of 330μF 400v? The chokes and large caps facing down on the driver board already dictate the final depth of the wooden base.

    Those caps are in series so what you really have is half the capacitance (165 uF) at double the voltage rating (800 volts). I have added more capacitance to the VTA ST-120 and it makes no difference in the sound of the amp or it's ability to play louder at higher volume levels.

    Bob
    sKiZo
    sKiZo


    Posts : 1530
    Join date : 2013-04-01
    Location : Michigan USA

    Custom Chassis? - Page 2 Empty Re: Custom Chassis?

    Post by sKiZo Sun Jun 09, 2013 6:21 pm

    Ah, you remembered the part about me likee loud. tongue

    OK then ... enough is enough!!

    sKiZo
    sKiZo


    Posts : 1530
    Join date : 2013-04-01
    Location : Michigan USA

    Custom Chassis? - Page 2 Empty Re: Custom Chassis?

    Post by sKiZo Sat Jul 06, 2013 4:59 pm

    Been some progress here ... tried updating earlier, but couldn't find the thread.

    Got the case together and the iron mounted ...

    Custom Chassis? - Page 2 Assembly-iron

    Turned out pretty decent I think. I added some dense foam strips to the dadoes that trap the top plate in the sides, then just used pocket screws to draw it together. Right tight, vibration proof, and feels solid. I'm leaving the iron bare. Once I cleaned off all the stack glue and polished them up, they looked good. The bells took on a nice gray metal tone. A couple coats of Never Dull metal polish should keep them from rusting or changing color.

    I did have a dOH! moment on the back panel.

    Custom Chassis? - Page 2 Assembly-back-panel

    I plan to use banana plugs with the speaker 5way jacks, and plenty of room for robust RCA interconnects. Couldn't get the fuse out though. dOH! Easy fix ... I just dremeled a slot into the cap - insert dime, twist, problem solved.

    Here's the internal layout. Amazing what a couple inches of height and depth can do. I kept looking about for stuff I forgot to put in. tongue 

    Custom Chassis? - Page 2 Assembly-internals

    I just cut straps for the caps out of roofing tin and used available mounting screws. Only thing missing is a small power converter I got coming to provide 24v for the light on the power switch. Pure bling there. The meters won't get mounted till the job's almost done to minimize movement shock. No sense bouncing them around any more than I have to.

    One concern ... the chokes are mounted to the wooden sides. Do they need to ground thru the mounting tabs? No big deal if I have to run a couple straps to the main chassis plate.

    All in all ... the hard part's done. Time to get out the soldering gun and see if I can blow it up!
    Bob Latino
    Bob Latino
    Admin


    Posts : 3265
    Join date : 2008-11-26
    Location : Massachusetts

    Custom Chassis? - Page 2 Empty Re: Custom Chassis?

    Post by Bob Latino Sat Jul 06, 2013 5:34 pm

    sKIZo,

     First of all you have done a great job with your custom VTA ST-120 ... This is only my opinion now - BUT - with all the wood work and custom chassis etc. I think you should paint the transformers. Some satin black paint would look nice with the black knobs, black tube sockets etc., etc. With that pale "gray look" you have now on the transformers, the transformers will look sort of "unfinished" when compared to the rest of the amp which looks beautiful.

    I have tried a lot of black paints on the transformers on these amps and my favorite now is the Krylon Fusion "Satin Black" which is Krylon's #2421 spray paint. This gives a low gloss subdued black color with a very durable surface.

    Bob
    sKiZo
    sKiZo


    Posts : 1530
    Join date : 2013-04-01
    Location : Michigan USA

    Custom Chassis? - Page 2 Empty Re: Custom Chassis?

    Post by sKiZo Sat Jul 06, 2013 6:14 pm

    Food for thought on the paint - but the pics really don't do the finish I got justice. I'm was figuring I'll get some interesting highlights by tube glow. Still ... I'll think on that for a while. Give me an excuse to enjoy the weather while I'm "thinking" ... a concern there would be how deep the Never Dull soaks in - I expect a good wipe with mineral spirits should clean that off for paint prep.

    So, no problem with the chokes? I don't believe the cases are part of the circuit, but I'd have to research that. Probably easier to just add the ground wires I mentioned earlier. I suppose that'd also tend to drain any other crap that hits the frame.

    I was also wondering about stretching the leads from the VTA board to the new bias pots. I was gonna go with some flat ribbon wire I got, but figure can't go wrong with twisted 22 gauge instead. That's a few inches more rf exposure to the leads, but I don't see that as an issue with those particular wires. Main concern for noise is the runs from the VTA board to the input jacks on the back. There's two sets, but they'll be bridged internally to eliminate external Y connectors, as I'll be feeding the amp from a tape loop on my quad receiver. I was thinking I'd add a metal shield behind those jacks also to minimize any noise potential.

    sKiZo
    sKiZo


    Posts : 1530
    Join date : 2013-04-01
    Location : Michigan USA

    Custom Chassis? - Page 2 Empty Re: Custom Chassis?

    Post by sKiZo Mon Jul 08, 2013 2:22 pm

    Bob Latino wrote:sKIZo,

    This is only my opinion now - BUT - with all the wood work and custom chassis etc. I think you should paint the transformers. Some satin black paint would look nice with the black knobs, black tube sockets etc., etc.

    You got me looking ... and if I look REAL close, I can already see a slight dusting of what looks suspiciously like rust. Sad 

    Good time to catch it as I haven't gotten into wiring it up yet. Have to pOp them puppies off and paint them. Sometimes it does pay to be slower than molasses in January.

    Thanx for making me look.

    EDIT >> Just got back from wandering thru the local hardware stores. Didna find the Krylon till the fourth stop. Dedication, eh ... tongue 

    Bit humid today, but also one of those merciless July blue skies ... great day for baking transformers!

    Custom Chassis? - Page 2 Xformer-bake-paint

    Do people rub these out, or just put a little wax on? I was also thinking of hitting the stacks with a 3M 00 pad to knock the shine off those for a two tone industrial look.

    BTW ... a shop turntable is wunnerful for this ... I hit the bottoms just to seal them, then flipped them over onto the wood boards. From there, I could move them back and forth to the turntable and then to the drying area. Worked pretty slick.

    Sponsored content


    Custom Chassis? - Page 2 Empty Re: Custom Chassis?

    Post by Sponsored content


      Current date/time is Thu Jun 27, 2024 10:07 am